NetBackup 7.6 Features:
1. Sybase SQL Anywhere database (NetBackup catalog) has been upgraded to version 12.0.1
¦ Automatic tuning of server threads
¦ Column statistics management
¦ Improved indexing performance
¦ Faster validation of large databases
¦ Improved request prioritization
2. The new NetBackup status code 2111 has been added to this release with the following description:
All storage units are configured with On Demand Only and are not eligible for jobs requesting ANY storage unit
3. Support for 64-bit NDMP devices
4. NetBackup utility enhancements – NBCC, NBCCA, NBCCR, and nbsu utilities
5. Hot fix / EEB preinstall checker
6. Catalog enhancements
- Catalog backup performance
- Catalog compression enhancements
7. NetBackup Logging Assistant – to set up, collect, and upload debug logs and other information to Symantec Technical Support
NetBackup 7.6 Status Code Additions:
Cleanup of status code 156 – These status codes include numbers 4200-4222
NetBackup 7.6 Command Additions:
1. bpplcatdrinfo – List, modify, or set disaster recovery policy
2. nbgetconfig – This command is the client version of bpgetconfig. It lets you view the local configuration on a client.
3. nboraadm – This command manages the Oracle instances that are used in Oracle backup policies.
4. nbrestorevm – This command restores VMware virtual machines
5. nbsetconfig – This command is the client version of bpsetconfig. It lets you edit the local configuration on a client
6. nbseccmd – runs the NetBackup Security Configuration service utility
7. configurePorts – This command is used to configure the Web ports for the Web Services Layer (WSL) application on the master server.
- bpclntcmd command logs messages to the usr/openv/netbackup/logs/bpclntcmd directory
- Vault log file location – install_path\NetBackup\vault\sessions\vault_name\sidxxx\logs\
$$$$$$$$$$$$$$$$$$$$$$$$$$$$$$$$$$$
NetBackup 7.5 Features:
1. NetBackpu Replication Director – offers a unified, policy-based management of backups, snapshots and replication(Snapvault, Snapmirror)
2. Virtualization – Support for vSphere 5, Granular recovery for Exchange and SharePoint virtual machines, New policy-type for VMware & Hyper-V
3. NetBackup Search – Search across multiple domains, save, edit, and export and search queries; is a licensable feature.
4. DeDuplication – Integration of Auto Image Replication for media server deduplication
5. OS Compatibility Additions
6. OpsCenter Enhancements
7. Accelerator – offers intelligent, streamlined backups to disk
8. Cloud based data protections – a new Cloud-based storage that features Encryption
9. Telemetry – provides data collection and upload capabilities for NetBackup and OpsCenter installations.
NetBackup 7.5 Command Additions:
1. nbplupgrade – The nbplupgrade utility upgrades policies from the MS-Windows type to the new VMware or Hyper-V policy type.
2. nbfindfile – lets you search files or folders based on simple search criteria like file name and path.
3. W2Koption – runs the utility program that modifies normal backup and restore behavior.
4. nbdiscover – tests the query rules for automatic selection of VMware virtual machines for backup.
5. nbperfchk – measures the read and write speed of a disk array such as the disks that host deduplicated data
6. nbevingest – for ingesting file system data restored from NetBackup into Enterprise Vault for e-discovery of NetBackup data.
7. vnetd – command allows all socket communication to take place while connecting to a single port
8. nbstl -conflict – is specified, the changes to the SLP described by the other options on the command are submitted for policy/SLP validation
9. nbstlutil -version; -jobid; -policy – nbrbutil command attribute additions.
10. nbholdutil – command runs the utility that places legal holds on backup images. Legal holds provide a mechanism to override existing retention levels.
NetBackup 7.5 Status Code Additions:
1. 1002
2. 1401 – 1426
3. 1450 – 1468
4. 2820
5. 5000 – 5034
- Removed 2,5,6 status codes
Media Server Deduplication Pool (MSDP)
$$$$$$$$$$$$$$$$$$$$$$$$$$$$$$$$$$$
HP UX:
/var/adm/syslogs – Systems logs
ioscan -fnC – Command to Scan Devices
/var/spool/cron/crontabs – Cron Tab Location
insf e – Command to add Device file
ps -eaf | grep “bpbkar” – Command to grep
kill -9 PID – To kill Process
/usr/contrib/bin/gunzip ./Managerhpux.tar.gz
$$$$$$$$$$$$$$$$$$$$$$$$$$$$$$$$$$$
Other OS:
/var/adm/messages – Solaris
Solaris – sgscan, iostat -En
cfgadm -al | grep tape – Solaris tape device scan
HP-UX – ioscan, dmesg, getconf
AIX – ovpassdrivers
Linux – dmesg, lspci, hwinfo
Windows – Device Monitor
TO Scan tape devices in Linux and AIX Server:
lsdev – AIX Server
lspci – Linux Server
$$$$$$$$$$$$$$$$$$$$$$$$$$$$$$$$$$$
To Start Image Cleanup manually – bpimage -cleanup -allclients
To Start Catalog Image Consistency – bpdbm -consistency 2
TO check due jobs for a specific time – nbpemreq –predict –date mm/dd/yyyy hh:mm:ss
nbproxy is the one which will interact with bpdbm process
vnetd is the one for outer communications
Unified Logging Logs – nbpem,nbjm,nbgenjob,nbsvcmon,PBX,nbrb,nbemm,bpbrm
Enabling logs on Media Manager logs – /usr/openv/volmgr/vm.conf
Unified Logging Format – productID-originatorID-hostID-date-rotation.log(51216-111-3474696384-060710-0000000051.log)
NBDB – running on Sybase Adaptive Server Anywhere (ASA) 9.0.1
Ping the Sybase Server – nbdbms_start_server -stat(UNIX) and nbdb_ping.exe(WINDOWS)
Sybase Server process – UNIX (NB_dbsrv) and WINDOWS(dbsrv9)
master and media servers are members of an EMM domain – nbemmcmd –listhosts -verbose and nbemmcmd -getemmserver
Media and Device Selection (MDS)
bppolicynew policy_name -sameas template_policy” – Command to copy policies
Displaying Allocations and Orphaned Resources – nbrbutil –dump or nbrbutil –listOrphanedMedia or nbrbutil -listOrphanedDrives or nbrbutil –listOrphanedStus
Catalog Consistency – bpdbm -consistency
$$$$$$$$$$$$$$$$$$$$$$$$$$$$$$$$$$$
To Check Devices present:
Solaris – dmesg, sgscan, iostat -En
HP-UX – ioscan, dmesg, getconf
AIX – lsattr, lsdev
Linux – dmesg, lspci, hwinfo
Windows – Device Monitor
HP UX insf e – Creating device file
$$$$$$$$$$$$$$$$$$$$$$$$$$$$$$$$$$$
Command to change Policy STU
./bpplinfo “POLICYNAME” -modify -residence STUNAME
TO check the drive Status – mt command (Solaris)
To check the drive status – install_path\Volmgr\bin\nt_ttu.exe
Tape Mount and Unmount – tpreq and tpunmont
Device Visibility – vmglob (WINDOWS) scan and sgscan (UNIX only)
Is Server SSO Licensed – nbemmcmd -listhosts -verbose ( Machine Flag Shows it- if its (1=SSO;2=NDMP;4=Remote Client;7= All)
Drive Tape alert codes – (CRT Means Critical)
0x14 – CRT Clean now
0x15 – CRT Clean Periodic
0x1E – CRT Hardware A
0x1F – CRT Hardware B
Device Mapping File – What is this exactly mean?
$$$$$$$$$$$$$$$$$$$$$$$$$$$$$$$$$$$
NDMP Configuration:
useradmin user add <ndmpuser> -g “Backup Operators”
ndmpd password ndmpuser
set_ndmp_attr -insert -auth <filer_hostname> ndmpuser <password>
set_ndmp_attr -verify
set_ndmp_attr -probe
NetBackup 7.0 NDMP Command is tpautoconf
Starting from 7.0
tpconfig to add NDMP host
tpautoconf to verify and probe NDMP host
$$$$$$$$$$$$$$$$$$$$$$$$$$$$$$$$$$$
Making DSU up and down:
./nbdevconfig -changestate -stype NearStore -dp dstu_fs_x_06_1 -state UP
./nbdevconfig -changestate -stype NearStore -dp dstu_fs_x_06_1 -state DOWN
./nbdevquery -listdp -stype NearStore -dp dstu_fs_nt_21_2 -U
./bperror -disk – To Identify all DSU Errors
/usr/openv/netbackup/bin/bp.kill_all
/usr/openv/netbackup/bin/bp.start_all
/usr/openv/netbackup/goodies/netbackup stop
/usr/openv/netbackup/goodies/netbackup start
C:\Veritas\netbackup\bin\bpdown
C:\Veritas\netbackup\bin\bpup
./bpps -x
$$$$$$$$$$$$$$$$$$$$$$$$$$$$$$$$$$$
Command to Make Drive down and up:
./vmoprcmd -h masterserer -up 18
./vmoprcmd -devmon -dp -h mediaserver
$$$$$$$$$$$$$$$$$$$$$$$$$$$$$$$$$$$
Editing STU Settings:
./bpsturep -label VTL_C1 -cj 13 – Max Concurrent jobs
$$$$$$$$$$$$$$$$$$$$$$$$$$$$$$$$$$$
RobTest:
/usr/openv/volmgr/bin/robtest
init – initialize element status
debug – debug mode
test_ready – Send test unit ready signal
s – status
d – drive
p – Cap(Media Access port)
s – slot
m <from> <to>
mode- display library informations
allow/prevent – allow/prevent media removal
inquiry – display vendor informations
$$$$$$$$$$$$$$$$$$$$$$$$$$$$$$$$$$$
About Media:
NetBackup freezes media automatically when read or write errors surpass the threshold within the time window. The default media error threshold is 2. That is, NetBackup freezes media on the third media error in the default time window (12 hours).
NetBackup also freezes a volume if a write failure makes future attempts at positioning the tape unreliable.
Common reasons for write failures are dirty write heads or old media. The reason for the action is logged in the NetBackup error catalog (view the Media Logs report or the All Log Entries report).
You can use the NetBackup nbemmcmd command with the -media_error_threshold and -time_window options to change the default values.
A single command that will return a list of catalog tapes is this:
- /usr/openv/volmgr/bin/vmquery -a -w |awk ‘$28==1 {print $1}’
However, for detailed verification, you could run the following command to generate a list of all tapes:
- /usr/openv/volmgr/bin/vmquery -a > /tmp/vmquery.out
$$$$$$$$$$$$$$$$$$$$$$$$$$$$$$$$$$$
Start netbackup service on unix/linux:
/etc/init.d/xinetd restart – Linux
/etc/init.d/netbackup start/stop
/usr/openv/netbackup/bin/goodies/netbackup stop/start
/usr/openv/netbackup/bin/goodies/nbclient stop/start
xinetd netbackup stop / start
$$$$$$$$$$$$$$$$$$$$$$$$$$$$$$$$$$$
To Check MDS:
/usr/openv/netbackup/bin/admincmd
nbrbutil -dump
-releaseMDS
-listOrphanedMedia
-listOrphanedDrives
-releaseOrphanedMedia [name]
-releaseOrphanedDrive [name]
-releaseDrive
-releaseMedia
$$$$$$$$$$$$$$$$$$$$$$$$$$$$$$$$$$$
Managing client entries on master:
./bpclient -client CLIENTNAME
-add
-update
-delete
-max_jobs
$$$$$$$$$$$$$$$$$$$$$$$$$$$$$$$$$$$
NetBackup Ports:
vnetd – 13724
pbx – 1556
bpcd – 13782 (Master to Client)
bprd – 13720 (Client to Master)
vxat – 2821
vxaz – 4032
bpdbm – 13721
bpjava – 13722
bpjobd – 13723
NDMP – 10000
vmd – 13701
$$$$$$$$$$$$$$$$$$$$$$$$$$$$$$$$$$$
Command to Force Media Server Restore:
FORCE_RESTORE_MEDIA_SERVER in bp.conf and ./bprdreq -rereadconfig
$$$$$$$$$$$$$$$$$$$$$$$$$$$$$$$$$$$
Connectivity Commands:
telnet CLIENTNAME 13782
telnet MASTERNAME 13720
bptestbpcd -verbose -client <client-name>
bpclntcmd -pn
bpcoverage -c clientserver
“REQUIRED_INTERFACE” Key need to be added to go Backup LAN Traffic
$$$$$$$$$$$$$$$$$$$$$$$$$$$$$$$$$$$
Check NetBackup Backup and Restore flow
$$$$$$$$$$$$$$$$$$$$$$$$$$$$$$$$$$$
Catalog Backup:
\NetBackupDB
\Conf
Server.conf
databases.conf
\data
NBDB.db
EMM_DATA.db
EMM_INDEX.db
NBDB.log
vxdbms.conf
BMRDB.db
BMRDB.log
BMR_DATA.db
BMR_INDEX.db
\NetBackup\DB
\class
\class_template
\config
\error
\failure_history
\images
\Client_1
\Client_N
\Master
\Media_Server
\jobs
\media
\script
\NetBackup\var
\NetBackup\Vault
$$$$$$$$$$$$$$$$$$$$$$$$$$$$$$$$$$$
Catalog Commands:
bpcatarc – Processes the output of bpcatlist and backup those images and write backup ID on each image file.
bpcatlist – List the Catalog images
bpcatrm – Processes the output of bpcatlist/bpcatarc and delete the images that have proper image/backup ID.
bpcatres – Processes the output of bpcatlist to restore the selected catalog image .f files.
bpbackupdb – backs up only Image Catalog
$$$$$$$$$$$$$$$$$$$$$$$$$$$$$$$$$$$
Catalog Recovery Jobs:
Activity Monitor displays multiple jobs
•One Catalog Recovery job
•Multiple (3) Restore jobs
$$$$$$$$$$$$$$$$$$$$$$$$$$$$$$$$$$$
DR Mail Contents:
-Server,Date,Policy,Catalog Backup Status, Primary Catalog Medias, Procedure to recover with/without DR file and
With DR File:
1. Install NetBackup.
2. Configure the devices necessary to read the media listed above.
3. Inventory the media.
4. Make sure that the master server can access the attached DR image file.
5. bprecover -wizard or bprecover -r ALL
With out DR File:
1. Install NetBackup.
2. Configure the devices necessary to read the media listed above.
3. Inventory the media.
4. Run:
bpimport -create_db_info [-server name] -id BB0471
5. Go to the following directory to find the DR image file
GS_lfbkp01_catalog_1320120140_FULL:
/usr/openv/netbackup/db/images/lfbkp01/1320000000/tmp
6. Delete the other files in the directory.
7. Open GS_lfbkp01_catalog_1320120140_FULL file and find the BACKUP_ID (for example: lfbkp01_1320120140).
8. Run:
bpimport [-server name] -backupid lfbkp01_1320120140
9. Run:
bprestore -T -w [-L progress_log] -C lfbkp01 -t 35 -p GS_lfbkp01_catalog -X -s 1320120140 -e 1320120140 /
10. Run the BAR user interface to restore the remaining image database if the DR image is a result of an incremental backup.
11. To recover the NetBackup relational database, run:
bprecover -r -nbdb
12. Stop and Start NetBackup
13. Configure the devices if any device has changed since the last backup.
14. To make sure the volume information is updated, inventory the media to update the NetBackup database.
$$$$$$$$$$$$$$$$$$$$$$$$$$$$$$$$$$$
VMWare VCB Backups:
1. Click Media and Device Management > Credentials > Virtual Machine Servers.
2. Create FlashBackup-WINDOWS Policy
3. Configuration parameters:
Client Name Selection – VM Hostname, VM Displayname, VM UUID
VM backup type – File Level Snapshot, FUll VM,Mapped Full, FUll Backup with file level incremental
Transfer types – san, nbd, nbdssl, try san then nbd, try san then nbdssl
Virtual machine quiesce – Enabled, Disabled
Monolithic export(VCB only) – 2 GB Chungs
Snapshot mount point (VCB only) – D:\mnt
Troubleshooting:
bpfis – snapshot creating and backup
bpvmutil – Policy configuration and restore
bpvmreq – Restore
VM File is located under NetBackup\online_ftl\
$$$$$$$$$$$$$$$$$$$$$$$$$$$$$$$$$$$
VTL Details
Model used – VTL1400 and VTL700
$$$$$$$$$$$$$$$$$$$$$$$$$$$$$$$$$$$
Zone Concept Includes:
Zones – Contains Set of member devices
Default Zone – Contains Set of devices which are not part of zone
Zone Sets – Group of zones that, we can activate and deactive
Active Zone Set – Zone Set which is currently active
1. Zone Creation: Zone and Zone Members
2. Add/Remove members from Zone
3. Save the Zone to Zone Set
4. Active it
$$$$$$$$$$$$$$$$$$$$$$$$$$$$$$$$$$$
Media Double Import:
Phase 1 of the import is relatively quick, as NetBackup is reading only the tape headers off the media. (bpimport -create_db_info -id <mediaid> -server <master_server_hostname> -L <progress_log>)
Phase 2 however, NetBackup is recreating the files information in the images database (bpimport -Bidfile <filename_with_image_ids> -L <progress_log>)
- Phase 1 of the import is relatively quick, as NetBackup is reading only the tape headers off the media. During Phase 2 however, NetBackup is recreating the files information in the images database. This phase may take some time to complete, depending on the number and size of images being imported. Each image imported will likely take as long, if not longer than, the original backup.
- Once the Phase 2 import is complete, the image has the same retention level as the original backup and a new expiration date calculated as the import date plus the retention period defined currently in Host Properties for the original backup’s retention level. At this point, the image is restorable like the original backup.
$$$$$$$$$$$$$$$$$$$$$$$$$$$$$$$$$$$
Frozen and Suspended Media: Both medias unavail for Backup and avail for restores
$$$$$$$$$$$$$$$$$$$$$$$$$$$$$$$$$$$
Default Volume Pools:
NetBackup
DataStore
None
Catalog Backup
$$$$$$$$$$$$$$$$$$$$$$$$$$$$$$$$$$$
Moving EMM DB:
1. Stop NetBackup
2. Start ASA Server Service alone
3. Add necessary enviromental variables – /usr/openv/db/vxdbms_env.sh
4. Start NetBackup Relational Database Administration Tool – /usr/openv/db/bin/dbadm and give password as “nbsql” and select option ‘5’(Move Database)
$$$$$$$$$$$$$$$$$$$$$$$$$$$$$$$$$$$
NBU Upgrading sequence when EMM is on different server:
1. EMM Server
2. Master Server
3. Media Server
4. Client servers
$$$$$$$$$$$$$$$$$$$$$$$$$$$$$$$$$$$
Upgrading NetBackup from 5.x to 6.x:
1. Do Full backup of Master and Media Servers
2. Deactivate Policies and Deactive request deamon (bprdreq –terminate)
3. Make sure no Backups are active
4. Perform Full Catalog Backup
5. For Cluster Systems, Take NetBackup resource to offline and freeze the NBU Group
6. Install New NBU SW
7. unfreeze active node
8. Check nbdb_ping and run create_nbdb if DB is not created
9. Install MP;s
10. Suspend Resource allocation by nbrbutil –suspend
11. nbpushdata—push information from current database files to EMM database
12. Upgrade media server and client servers
13. Reactive Policies and Test the Backup
$$$$$$$$$$$$$$$$$$$$$$$$$$$$$$$$$$$
Updating UNIX Client:
cd /usr/openv/netbackup/bin
./update_dbclients Oracle -ClientList /tmp/clientlist
./update_clients -ForceInstall -ClientList /tmp/cfile
With NetBackup 7.0 – Agents comes with Client binaries, So no need to separately do it.
$$$$$$$$$$$$$$$$$$$$$$$$$$$$$$$$$$$
NDMP Types:
Local NDMP – Robot Attached to NDMP Host
Remote NDMP – Robot Attached to Media Server
3-Way NDMP – Robot attached to another NDMP Host
$$$$$$$$$$$$$$$$$$$$$$$$$$$$$$$$$$$
non-Direct Access Recovery (DAR) – NDMP
non-Direct Access Recovery (DAR) restore) may take a long time. The default Veritas NetBackup ™ behavior is an 8-hour timeout value when waiting for NDMP operations to complete.
It is possible to modify this timeout value by creating the NDMP_PROGRESS_TIMEOUT in path /usr/openv/netbackup/db/config/
$$$$$$$$$$$$$$$$$$$$$$$$$$$$$$$$$$$
bp.conf file Entries:
CLIENT_READ_TIMEOUT
BPBACKUP_POLICY
BPBACKUP_SCHED
BPARCHIVE_POLICY
BPARCHIVE_SCHED
CLIENT_CONNECT_TIMEOUT
Client bp.conf entries:
The following entries can be entered into the bp.conf file on clients:
AUTHENTICATION_DOMAIN
See AUTHENTICATION_DOMAIN bp.conf entry for UNIX servers and clients.
ALLOW_NON_RESERVED_PORTS
See ALLOW_NON_RESERVED_S bp.conf entry for UNIX servers and clients.
BPARCHIVE_POLICY
See BPARCHIVE_POLICY bp.conf entry for UNIX clients.
BPARCHIVE_SCHED
See BPARCHIVE_SCHED bp.conf entry for UNIX clients.
BPBACKUP_POLICY
See BPBACKUP_POLICY bp.conf for UNIX clients.
BPBACKUP_SCHED
See BPBACKUP_SCHED bp.conf entry for UNIX clients.
BUSY_FILE_ACTION
See BUSY_FILE_ACTION bp.conf entry for UNIX clients.
BUSY_FILE_DIRECTORY
See BUSY_FILE_DIRECTORY bp.conf entry for UNIX clients.
BUSY_FILE_NOTIFY_USER
See BUSY_FILE_NOTIFY_USER bp.conf entry for UNIX clients.
BUSY_FILE_PROCESSING
See BUSY_FILE_PROCESSING bp.conf entry for UNIX clients.
CLIENT_NAME
See CLIENT_NAME bp.conf entry.
CLIENT_PORT_WINDOW
See CLIENT_PORT_WINDOW bp.conf entry for UNIX servers and clients.
CLIENT_RESERVED_PORT_WINDOW
See CLIENT_RESERVED_PORT_WINDOW bp.conf entry for UNIX servers and clients.
COMPRESS_SUFFIX
See COMPRESS_SUFFIX bp.conf entry for UNIX clients.
CRYPT_CIPHER
See CRYPT_CIPHER bp.conf entry for UNIX clients.
CRYPT_KIND
See CRYPT_KIND bp.conf entry for UNIX clients.
CRYPT_OPTION
See CRYPT_OPTION bp.conf entry for UNIX clients.
CRYPT_STRENGTH
See CRYPT_STRENGTH bp.conf entry for UNIX clients.
CRYPT_LIBPATH
See CRYPT_LIBPATH bp.conf entry for UNIX clients.
CRYPT_KEYFILE
See CRYPT_KEYFILE bp.conf entry for UNIX clients.
DISALLOW_SERVER_FILE_WRITES
See DISALLOW_SERVER_FILE_WRITES bp.conf entry for UNIX clients.
DO_NOT_RESET_FILE_ACCESS_TIME
See DO_NOT_RESET_FILE_ACCESS_TIME bp.conf entry for UNIX clients.
GENERATE_ENGLISH_LOGS
See GENERATE_ENGLISH_LOGS bp.conf entry for UNIX servers and clients.
IGNORE_XATTR
See IGNORE_XATTR bp.conf entry for UNIX clients.
INFORMIX_HOME
See INFORMIX_HOME bp.conf entry for UNIX clients.
INITIAL_BROWSE
See INITIAL_BROWSE_SEARCH_LIMIT bp.conf entry for UNIX servers and clients.
KEEP_DATABASE_COMM_FILE
See KEEP_DATABASE_COMM_FILE bp.conf entry for UNIX clients.
KEEP_LOGS_DAYS
See KEEP_LOGS_DAYS bp.conf entry for UNIX clients.
LIST_FILES_TIMEOUT
See LIST_FILES_TIMEOUT bp.conf entry for UNIX clients.
LOCKED_FILE_ACTION
See LOCKED_FILE_ACTION bp.conf entry for UNIX clients.
MEDIA_SERVER
See MEDIA_SERVER bp.conf entry for UNIX clients.
MEGABYTES_OF_MEMORY
See MEGABYTES_OF_MEMORY bp.conf entry for UNIX clients.
NFS_ACCESS_TIMEOUT
See NFS_ACCESS_TIMEOUT bp.conf entry for UNIX clients.
RANDOM_PORTS
See RANDOM _PORTS bp.conf entry for UNIX servers and clients.
RESTORE_RETRIES
See RESTORE_RETRIES bp.conf entry for UNIX clients.
SERVER_PORT_WINDOW
See SERVER_PORT_WINDOW bp.conf entry for UNIX servers and clients.
SERVER
See SERVER bp.conf entry for UNIX clients.
SYBASE_HOME
See SYBASE_HOME bp.conf entry for UNIX clients.
USE_CTIME_FOR_INCREMENTALS
See USE_CTIME_FOR_INCREMENTALS bp.conf entry for UNIX clients.
USE_FILE_CHG_LOG
See USE_FILE_CHG_LOG bp.conf entry for UNIX clients.
USE_VXSS
See USE_VXSS bp.conf entry for UNIX servers and clients.
USEMAIL
See USEMAIL bp.conf entry for UNIX clients.
VERBOSE
See VERBOSE bp.conf entry for UNIX servers and clients.
VXSS_NETWORK
See VXSS_NETWORK bp.conf entry for UNIX clients.
$$$$$$$$$$$$$$$$$$$$$$$$$$$$$$$$$$$
Network Buffer Size:
/usr/openv/netbackup/NET_BUFFER_SZ – Backup
/usr/openv/netbackup/NET_BUFFER_SZ_REST – Restore
Default Value – 32 KB
Max Vaule – 128 KB
$$$$$$$$$$$$$$$$$$$$$$$$$$$$$$$$$$$$$$$$$$$$$$$$$$$$$$$$$$$$$$$$$$$$$$$$$$$$$$$$$$$$$$$$$$$$$$$$$$$$$$$$$$$$$$$$$$$$$$$$$$$$$$$$$$$$$$$$$$$$$$$$$$$$$$$$$$$$$$$$$$$$$$$$$$$$$$$$$$$
How to update Device Configuration Files:
The files external_robotics.txt and external_types.txt are used by the NetBackup Enterprise Media Manager database to determine which protocols and settings to use to communicate with storage devices. They are also used by the Device Configuration Wizard to automatically configure new devices.
1. Download and extract the new mappings file package to a temporary directory:
tar -xvf Mappings_v1117.tar
This will create three files in the temporary location:
Readme.txt
external_types.txt
external_robotics.txt
2. Copy the external_types.txt file from the temporary location to /usr/openv/var/global on the Master Server or the EMM Server.
cp /temp_dir/external_types.txt /usr/openv/var/global/
(For NetBackup High Availability environments, copy the file to the shared disk.)
3. Copy the external_robotics.txt file from the temporary location to /usr/openv/var/global on the master server, EMM Server, each media server that controls a robot, and each media server from which robot inventories will be run.
cp /temp_dir/external_robotics.txt /usr/openv/var/global/
(For NetBackup High Availability environments, copy the file to the shared disk.)
4. Update the NetBackup Enterprise Media Manager database with the new device mappings version. This only needs to be done once and must be run from the Master Server or the EMM Server. Use the command format below that corresponds to the installed version of NetBackup:
NetBackup 6.5/7.0/7.1/7.5: /usr/openv/volmgr/bin/tpext -loadEMM
NetBackup 6.0: /usr/openv/volmgr/bin/tpext
5. For Media Servers running 6.0_MP4 and earlier, manually update each Media Server with the new device mappings. (On Media Servers running 7.5, 7.1, 7.0, 6.5 or 6.0_MP5 and later, this command is not needed since ltid will update the device mappings when it starts.) This command must be run on each 6.0_MP4 and earlier Media Server that has devices attached::
/usr/openv/volmgr/bin/tpext -get_dev_mappings
6. Restart Device Manager (ltid) on each Media Server.
7. Verify that the version that is now stored in the Enterprise Media Manager database is the same as what is in the file stored on the Media Server:
/usr/openv/volmgr/bin/tpext -get_dev_mappings_ver
$$$$$$$$$$$$$$$$$$$$$$$$$$$$$$$$$$$
(Unix)
/usr/openv/db/bin/dbadm
(Windows)
<install path>\Veritas\Netbackup\bin\NbDbAdmin.exe
Example on Unix:
Select #2 “Database Space and Memory Management”
Selected Database: NBDB
Status: UP
Consistency: OK
Space Utilization: 5 %
Database Administration
———————–
1) Select/Restart Database and Change Password
2) Database Space and Memory Management
3) Transaction Log Management
4) Database Validation Check and Rebuild
5) Move Database
6) Unload Database
7) Backup and Restore Database
8) Refresh Database Status
h) Help
q) Quit
ENTER CHOICE: 2
Select #4 “Adjust Memory Settings”
Selected Database: NBDB
Database Space and Memory Management
————————————
1) Report on Database Space
2) Database Reorganize
3) Add Free Space
4) Adjust Memory Settings
h) Help
q) Quit
ENTER CHOICE: 4
Select the appropriate setting based on site size:
(Setting) (Initial) (Minimum) (Maximum)
Current 25M 25M 500M
Small 25M 25M 500M
Medium 200M 200M 750M
Large 500M 500M 1G
Adjust Memory Settings
———————-
1) Small Configuration
2) Medium Configuration
3) Large Configuration
4) Custom
h) Help
q) Quit
WARNING:
NetBackup must be restarted for settings to take effect.
If settings are too large, database server may not start.
ENTER CHOICE:
$$$$$$$$$$$$$$$$$$$$$$$$$$$$$$$$$$$
Vault:
Vault uses the primary backup image as the source image for the duplication operation. However, Vault duplicates from a nonprimary copy on disk if one exists.
Note: Vault does not select the SLP-managed images that are not lifecycle complete
Vault process:
¦ About choosing backup images
¦ About duplicating backup images
¦ About backing up the NetBackup catalog
¦ About ejecting media
¦ About generating reports
NetBackup Vault interacts with the following NetBackup services and catalogs:
¦ Media Manager, which manages robots and media
¦ The NetBackup catalog and the Media Manager database record of the images that have been vaulted
¦ The Media Manager database information which determines when expired media can be returned to the robot for reuse
¦ The Activity Monitor which displays the status of the Vault job
Vault Configuration:
¦ Create offsite volume pools
¦ Create a Vault catalog backup schedule
¦ Configuring Vault Management Properties
- General tab
¦ The email address for session status notification.
¦ The Email address for eject notification for all profiles.
¦ The sort order for ejected media.
- alternate media server names tab
- Retention Mappings tab
- Reports tab
¦ Configuring robots in Vault
¦ Creating a vault
¦ Creating retention mappings
¦ Creating profiles
Choose backups tab – Enables you to specify the criteria for selecting backup images.
Duplication tab – Enables you to configure duplication of the selected backup images.
Catalog Backup tab – Enables you to choose which catalog backup policy and schedule to use for creating a Vault catalog backup. For efficient disaster recovery, vault a new catalog backup each time you vault data.
Eject tab – Enables you to choose in which off-site volume pools Vault should look for the media you want to eject.
Reports tab – Enables you to choose which reports to generate.
¦ Vault sessions
- Scheduling a Vault session
- Creating a Vault policy
- Running a session manually
Session file – /usr/openv/netbackup/vault/sessions/vault_name/sidxxx
- “vltrun -preview ” – option starts a new vault job, performs a search on the image catalog based on the criteria specified on the profile Choose Backups tab, writes the names of the images to a preview.list file, and then exits. Vault does not act on the images selected.
- “vlteject -preview ” you can preview the media to be ejected
Vault Commands:
vltrun
vltadm
vlteject
vltopmenu
vltinject
vltcontainers – to add ejected medias to containers.
Vault Session files:
eject.list
preview.list
Vault Notify Scripts:
vlt_start_notify
vlt_ejectlist_notify
vlt_starteject_notify
vlt_endeject_notify
vlt_end_notify
$$$$$$$$$$$$$$$$$$$$$$$$$$$$$$$$$$$
Service Levels:
In the world of data protection, the service level is based on recovery capability—there is no such thing as a “backup service level.” Two key concepts underpin all recovery service levels:
Recovery point objective (RPO)—The most recent state to which an application or server can be recovered in the event of a failure. The RPO is directly linked to the frequency of the protection process; if the application is protected by backups alone, then it means how often a backup is run.
Recovery time objective (RTO)—The time required to recover the application or server to the RPO from the moment that a problem is detected. Many factors influence the RTO—including the provisioning of hardware and the roll-forward time for application transaction logs—but one constant factor is the time needed to restore the data from the backup or snapshot that forms the
RPO.
Data protection system – Tiers:
• Platinum service level—Uses snapshot backup technologies to take frequent backups of mission-critical applications such as order processing systems and transaction processing systems; typical RPO and RTO of one or two hours
• Gold service level—Uses frequent backups, perhaps every six hours or so, for important but non-critical applications such as e-mail, CRM, and HR systems; typical RPO and RTO of 12 hours or less
• Silver service level—daily backup, used to protect non-critical (such as user file and print data) and relatively static data. Typical RPO and RTO of one or two days.
• Fourth Tier – with longer RPO and RTO is added for data in, for example, test and development environments, where data is not critical to the business or can be easily recreated with relatively little time and effort.
$$$$$$$$$$$$$$$$$$$$$$$$$$$$$$$$$$$
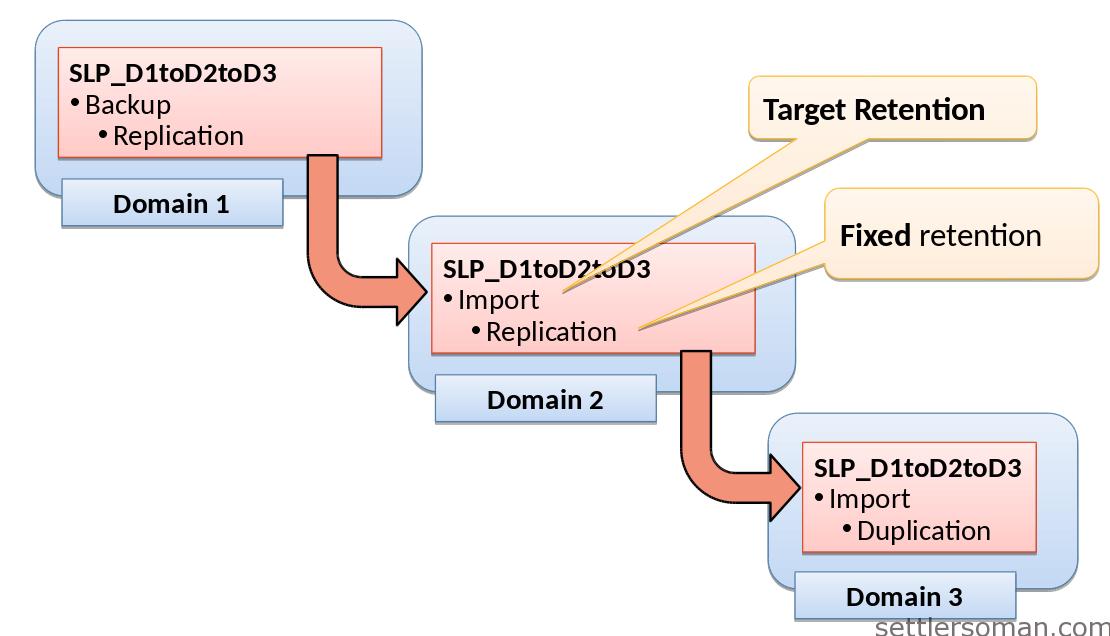
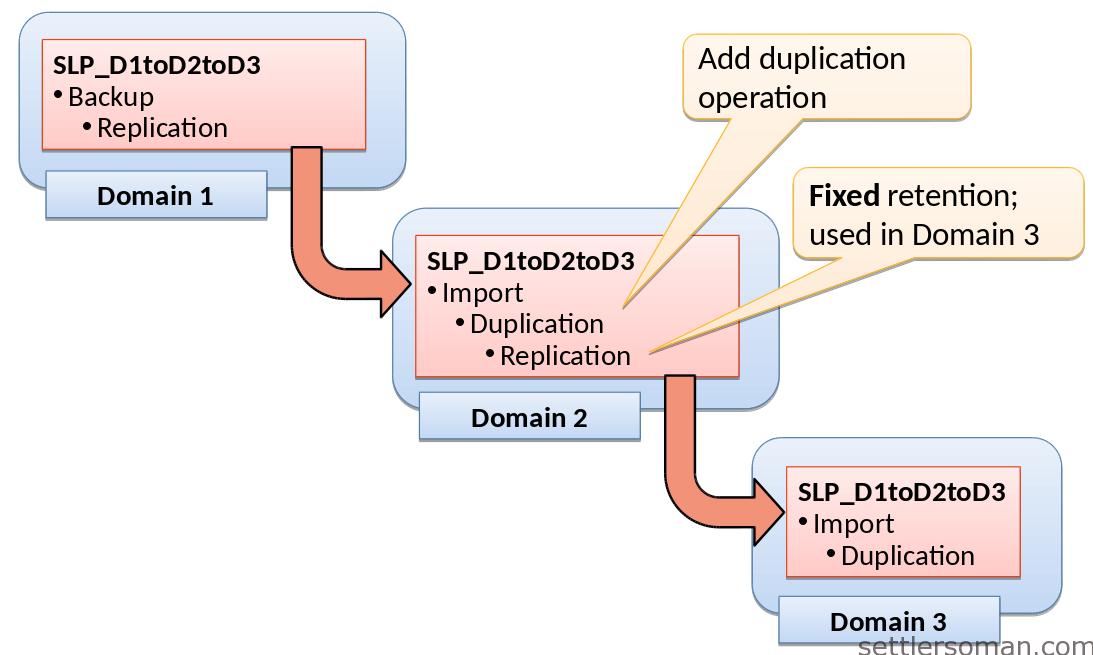
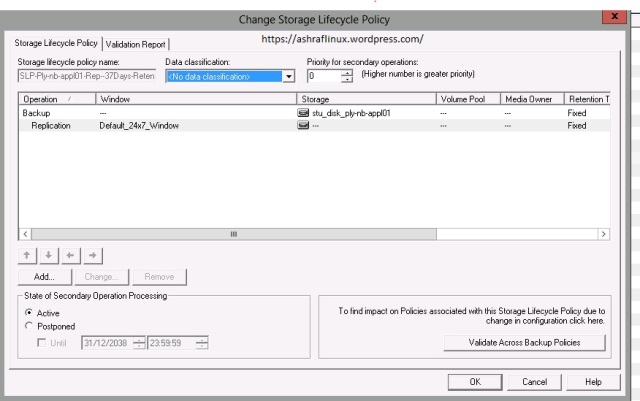
Storage Lifecycle Policy:
Storage Lifecycle Policy consists of two core components:
- a list of storage destinations where copies of the backup images will be stored
- the retention period for each copy
- A Storage Lifecycle Policy is a plan or map of where backup data will be stored and for how long. The Storage Lifecycle Policy determines where the backup is initially written to and where it is subsequently duplicated to. It also automates the duplication process and determines how long the backup data will reside in each location that it is duplicated to.
- A Storage Lifecycle Policy thus replaces both the duplication process and the staging process by introducing a series of storage locations or destinations that use different types of storage with different retention periods and by ensuring that data always exists at the appropriate locations at the appropriate phases of the lifecycle.
- By implementing a Storage Lifecycle Policy you remove the need for both Disk Staging Storage Units and duplication step in Vault profiles by defining all the locations where the data resides and for how long the data is retained in each location in a single policy definition.
- This is an acceptable trade-off, as the value of backup data decreases with time. Backup data is at its most valuable immediately after the backup has been made, and it is at that time that the RTO needs to be kept to a minimum. Once a more recent backup exists, the previous
backup is of less value because it does not offer the best RPO.
- The Data Classification has absolutely no effect at the time of the execution of the backup job. Data Classifications only control the way in which images are expired to create space in Capacity Managed Storage Destinations. Images associated with a lower classification are always expired first.
- In Veritas NetBackup 6.5 Data Classifications are used by Storage Lifecycle Policy to apply a rank to backup images written to the same Capacity Managed Storage Units so that they can be retained for different periods, overriding the traditional “first in first out” model associated with Disk Staging Storage Units;
- Thus when the high water mark is met, the images will be removed—starting with the images with the lowest Data Classification that have passed the try-to-keep time and then working up the data classifications until either the low water mark is met or there are no more images that are past their try-to-keep time.
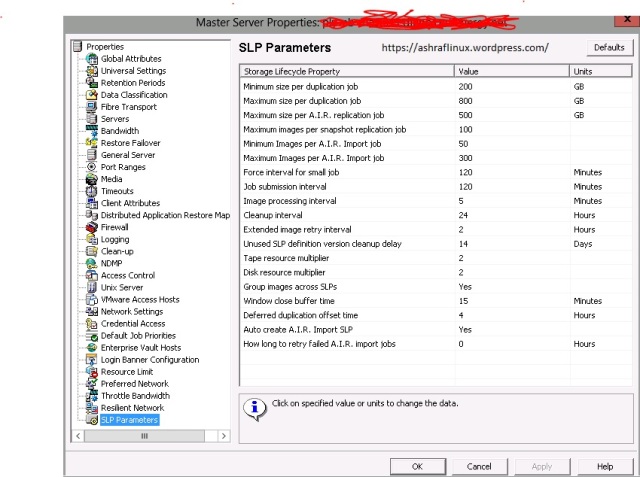
- The size and the frequency of duplication jobs requested by the Storage Lifecycle Policy can be specified in the LIFECYCLE_PARAMETERS file. Five parameters can be specified in this file.
The file is located at: /usr/openv/netbackup/db/config/LIFECYCLE_PARAMETERS
The five parameters are as follows:
• MIN_KB_SIZE_PER_DUPLICATION: This is the size of the minimum duplication batch
(default 8 GB).
• MAX_KB_SIZE_PER_DUPLICATION_JOB: This is the size of the maximum duplication batch
(default 25 GB).
• MAX_MINUTES_TIL_FORCE_SMALL_DUPLICATION_JOB: This represents the time interval
between forcing duplication sessions for small batches (default 30 minutes).
• IMAGE_EXTENDED_RETRY_PERIOD_IN_HOURS: After duplication of an image fails three times,
this is the time interval between subsequent retries (default 2 hours).
• DUPLICATION_SESSION_INTERVAL_MINUTES: This is how often the Storage Lifecycle Policy
service (nbstserv) looks to see if it is time to start a new duplication job(s) (default 5 minutes).
If this file does not exist, the default values will be used.
$$$$$$$$$$$$$$$$$$$$$$$$$$$$$$
To Change path of tape device automatically – ENABLE_AUTO_PATH_CORRECTION
Netbackup Reset Ops center password – vssat resetpasswd –pdrtype ab –domain OpsCenterUsers –prplname admin
Check SAP agent version – /usr/openv/netbackup/dbext/SAP.hpia64.version
Add user account to access Java console – /usr/openv/java/auth.conf
Different Access Groups Which can be specified in auth.conf
AM – Activity Monitor
BPM – Backup Policy Management
JBP – Backup, Archive, and Restore
DM – Device Monitor
MM – Media Management
REP – Reports
SUM – Storage Unit Management
ALL – All
To Check whether disk comes from local or SAN
govan # bdf /usr/openv
Filesystem kbytes used avail %used Mounted on
/dev/vg01/lvol1 1228931072 830851403 373206297 69% /usr/openv
govan # vgdisplay -v vg01
— Volume groups —
VG Name /dev/vg01
VG Write Access read/write
VG Status available
Max LV 2047
Cur LV 2
Open LV 2
Max PV 2048
Cur PV 5
Act PV 5
Max PE per PV 278864
VGDA 10
PE Size (Mbytes) 16
Total PE 81330
Alloc PE 75264
Free PE 6066
Total PVG 0
Total Spare PVs 0
Total Spare PVs in use 0
VG Version 2.1
VG Max Size 4461824m
VG Max Extents 278864
— Logical volumes —
LV Name /dev/vg01/lvol1
LV Status available/syncd
LV Size (Mbytes) 1200128
Current LE 75008
Allocated PE 75008
Used PV 5
LV Name /dev/vg01/lvol3
LV Status available/syncd
LV Size (Mbytes) 4096
Current LE 256
Allocated PE 256
Used PV 1
govan # powermt display dev=all
Pseudo name=disk68
Symmetrix ID=000195700850
Logical device ID=092E
state=alive; policy=SymmOpt; priority=0; queued-IOs=0;
==============================================================================
————— Host ————— – Stor – — I/O Path — — Stats —
### HW Path I/O Paths Interf. Mode State Q-IOs Errors
==============================================================================
4 0/2/1/0/4/0.0x50000973000d4954.0x4001000000000000 c31t0d1 FA 6fA active alive 0 0
6 0/5/1/0/4/0.0x50000973000d4968.0x4001000000000000 c33t0d1 FA 11fA active alive 0 1
SAP Manual Backup – su – orat08 -c brbackup -u / -c -p /usr/openv/netbackup/ext/db_ext/sap/scripts/T08/initT08.sap.online
Change Tape Drive type:
tpconfig -update -drive 7 -type hcart
To update NetBackup Inventory:
vmupdate -rt tld -rn 0 -rh glidden -empty_map -interactive
To mount a media:
tpreq -m <media id> -f /tmp/TAPE
To unmount a media:
tpunmount -f /tmp/TAPE
To update media type and barcode:
vmchange -new_mt <media_type> -m <media_id>
vmchange -barcode DD2107 -m DD2107-rt TLD
If using the ALL_LOCAL_DRIVES directive when setting up the policy for the client behind the firewall, then the following port will also need to be opened:
Master >> Client 13782 (bpcd)
Client >> Master 13724 (vnetd)
If the client needs to run user backups/restores, then the following port will also need to be opened:
Client >> Master
13720 (bprd)
If database backups are done from the client, then the following ports will also need to be opened:
Client >> Master
13720 (bprd)
13724 (vnetd)
Master >> Client
13782 (bpcd)
If using NetBackup enhanced authentication, you will also need to open:
Master >> Client
13783 (vopied)
To check the NDMP Tape drives connected to a NetApp Filer:
lhotse1> sysconfig -t
To check/kill the NDMP Sessions on a NetApp Filer:
system>ndmpd status [session]
system>ndmpd status all
system>ndmpd kill session_number
system>ndmpd kill all
To Add NDMP Host to NetBackup Configuration:
Windows: <install dir>\Veritas\Volmgr\bin\tpconfig -add -nh ndmp_hostname -user_id userID -password passwd
UNIX/Linux: /usr/openv/volmgr/bin/tpconfig -add -nh ndmp_hostname -user_id userID -password passwd
NDMP Backup/Restore Failure error codes:
NDMP_DEVICE_BUSY_ERR — The specified tape drive is already in use.
NDMP_DEVICE_OPENED_ERR — NDMP is attempting to open more connections than are allowed.
NDMP_NOT_AUTHORIZED_ERR — This error is returned if an NDMP request is issued before the connection has been authenticated.
NDMP_PERMISSIONS_ERR — The connection has been authenticated, but the credentials used lack the necessary permissions.
NDMP_DEV_NOT_OPEN_ERR — An attempt was made to access a device without first opening a connection to it.
NDMP_IO_ERR — The tape drive has returned an I/O error.
NDMP_TIMEOUT_ERR — The current operation has timed out.
NDMP_ILLEGAL_ARGS_ERR — The request contains an illegal argument.
NDMP_NO_TAPE_LOADED_ERR — There is no tape in the drive.
NDMP_WRITE_PROTECT_ERR — The tape in the drive is write protected.
NDMP_EOF_ERR — An unexpected end of file was encountered.
NDMP_EOM_ERR — The tape has run out of space (the End of Media Mark was encountered).
NDMP_FILE_NOT_FOUND_ERR — The requested file was not found.
NDMP_BAD_FILE_ERR — An error was caused by a bad file descriptor.
NDMP_NO_DEVICE_ERR — A request was made to a tape drive that does not exist.
NDMP_NO_BUS_ERR — The specified SCSI bus cannot be found.
NDMP_NOT_SUPPORTED_ERR — Either the NDMP protocol is not supported, or only a subset of the protocol is supported.
NDMP_XDR_DECODE_ERR — A message cannot be decoded.
NDMP_ILLEGAL_STATE_ERR — A request cannot be processed in its current state.
NDMP_UNDEFINED_ERR — A nonspecific error has occurred.
NDMP_XDR_ENCODE_ERR — There was an error encoding a reply message.
NDMP_NO_MEM_ERR — A memory allocation error.
NetBackup GUI reports and its corresponding command line informations:
Backup Status Report
The Backup Status report shows status and error information on jobs completed within the specified time period. If an error has occurred, a short explanation of the error is included.
- cd /usr/openv/netbackup/bin/admincmd
- ./bperror -U -backstat -s info [-d <start_date> <start_time> -e <end_date> <end_time>]
Client Backups Report
The Client Backups report shows detailed information on backups completed within the specified time period.
- cd /usr/openv/netbackup/bin/admincmd
- ./bpimagelist -U [-A|-client name] [-d <start_date> <start_time> -e <end_date> <end_time>]
Problems Report
The Problems report lists the problems that the server has logged during the specified time period. This information is a subset of the information you get from the All Log Entries report.
- cd /usr/openv/netbackup/bin/admincmd
- ./bperror -U -problems [-d <start_date> <start_time> -e <end_date> <end_time>]
All Log Entries Report
The All Log Entries report lists all log entries for the specified time period. This report includes the information from the Problems report and Media Log Entries report. This report also shows the transfer rate, which is useful in determining and predicting rates and backup times for future backups (the transfer rate does not appear for multiplexed backups).
- cd /usr/openv/netbackup/bin/admincmd
- ./bperror -U -all [-d <start_date> <start_time> -e <end_date> <end_time>]
Media List Report
The Media Lists report shows information for volumes that have been allocated for backups. This report does not show media for Disk type storage units or for backups of the NetBackup catalogs.
- cd /usr/openv/netbackup/bin/admincmd
- ./bpmedialist -U -mlist [-m <media_id>
Media Contents Report
The Media Contents report shows the contents of a volume as read directly from the media header and backup headers. This report lists the backup IDs (not each individual file) that are on a single volume. If a tape has to be mounted, there will be a longer delay before the report appears.
- cd /usr/openv/netbackup/bin/admincmd
- ./bpmedialist -U -mcontents [-m <media_id>]
Images on Media Report
The Images on Media report lists the contents of the media as recorded in the NetBackup image catalog. You can generate this report for any type of media (including disk) and filter it according to client, media ID, or path.
- cd /usr/openv/netbackup/bin/admincmd
- ./bpimmedia -U [-client <client_name>] [-mediaid <media_id>]
Media Log Entries Report
The Media Logs report shows media errors or informational messages that are recorded in the NetBackup error catalog. This information also appears in the All Log Entries report.
- cd /usr/openv/netbackup/bin/admincmd
- ./bperror -U -media [-d <start_date> <start_time> -e <end_date> <end_time>]
Media Summary Report
The Media Summary report summarizes active and non-active volumes for the specified server according to expiration date. It also shows how many volumes are at each retention level. In verbose mode, the report shows each media ID and its expiration date.
- cd /usr/openv/netbackup/bin/admincmd
- ./bpmedialist -summary
Media Written Report
The Media Written report identifies volumes that were used for backups within the specified time period.
- cd /usr/openv/netbackup/bin/admincmd
- ./bpimagelist -A -media [-d <start_date> <start_time> -e <end_date> <end_time>]
Volume detail (vmquery)
There is no NetBackup GUI equivalent for the Volume detail report. This is a command line method to get details for all tapes or a specific tape. This can be used as a complement to other Media reports.
- cd /usr/openv/volmgr/bin
- ./vmquery -a
or
- ./vmquery -m <media_id>
To force media server read request to alternative host:
Add FORCE_RESTORE_MEDIA_SERVER to the /usr/openv/netbackup/bp.conf file in the following format:
FORCE_RESTORE_MEDIA_SERVER = from_host to_host
FORCE_RESTORE_MEDIA_SERVER = weber-bk jummy-bk
To check the HP-UX Tape Drive Issues:
galahad-bk # fcmsutil /dev/fcd5
Vendor ID is = 0x001077
Device ID is = 0x002422
PCI Sub-system Vendor ID is = 0x00103c
PCI Sub-system ID is = 0x0012df
PCI Mode = PCI-X 133 MHz
ISP Code version = 4.4.4
ISP Chip version = 3
Topology = PTTOPT_FABRIC
Link Speed = 4Gb
Local N_Port_id is = 0x540223
Previous N_Port_id is = 0x540223
N_Port Node World Wide Name = 0x50014380017af5f7
N_Port Port World Wide Name = 0x50014380017af5f6
Switch Port World Wide Name = 0x21e7000573b4b280
Switch Node World Wide Name = 0x2002000573b4b281
Driver state = ONLINE
Hardware Path is = 0/2/1/0/4/1
Maximum Frame Size = 2048
Driver-Firmware Dump Available = NO
Driver-Firmware Dump Timestamp = N/A
Driver Version = @(#) libfcd.a HP Fibre Channel ISP 23xx & 24xx Driver B.11.23.0909 /ux/core/isu/FCD/kern/src/common/wsio/fcd_init.c:Jun 5 2009,11:15:21
galahad-bk #galahad-bk # ioscan -f | grep ‘tape’ | grep ‘HP’
tape 46 0/1/1/0/4/0.84.2.255.4.4.0 stape CLAIMED DEVICE HP Ultrium 4-SCSI
tape 44 0/1/1/0/4/0.84.2.255.6.10.0 stape CLAIMED DEVICE HP Ultrium 4-SCSI
tape 26 0/1/2/0/4/0.228.0.255.4.5.0 stape CLAIMED DEVICE HP Ultrium 4-SCSI
tape 56 0/2/1/0/4/1.84.2.255.4.5.0 stape CLAIMED DEVICE HP Ultrium 4-SCSI
tape 58 0/2/1/0/4/1.84.2.255.6.6.0 stape CLAIMED DEVICE HP Ultrium 4-SCSI
tape 25 0/5/1/0/4/1.228.0.255.4.6.0 stape CLAIMED DEVICE HP Ultrium 4-SCSI
galahad-bk #
galahad-bk # ioscan -fnC tape | grep ‘NO_HW’
glidden # ioscan -fnuC tape
Class I H/W Path Driver S/W State H/W Type Description
==================================================================
tape 12 0/1/1/0/4/1.220.1.255.2.9.0 stape CLAIMED DEVICE HP Ultrium 4-SCSI
/dev/rmt/12m /dev/rmt/12mn /dev/rmt/c19t9d0BEST /dev/rmt/c19t9d0BESTn
/dev/rmt/12mb /dev/rmt/12mnb /dev/rmt/c19t9d0BESTb /dev/rmt/c19t9d0BESTnb
tape 13 0/1/1/0/4/1.220.1.255.3.5.0 stape NO_HW DEVICE HP Ultrium 4-SCSI
/dev/rmt/13m /dev/rmt/13mn /dev/rmt/c20t5d0BEST /dev/rmt/c20t5d0BESTn
/dev/rmt/13mb /dev/rmt/13mnb /dev/rmt/c20t5d0BESTb /dev/rmt/c20t5d0BESTnb
tape 8 0/2/1/0/4/1.220.1.255.3.1.0 stape NO_HW DEVICE HP Ultrium 4-SCSI
/dev/rmt/8m /dev/rmt/8mn /dev/rmt/c16t1d0BEST /dev/rmt/c16t1d0BESTn
/dev/rmt/8mb /dev/rmt/8mnb /dev/rmt/c16t1d0BESTb /dev/rmt/c16t1d0BESTnb
tape 9 0/2/1/0/4/1.220.1.255.3.2.0 stape NO_HW DEVICE HP Ultrium 4-SCSI
/dev/rmt/9m /dev/rmt/9mn /dev/rmt/c16t2d0BEST /dev/rmt/c16t2d0BESTn
/dev/rmt/9mb /dev/rmt/9mnb /dev/rmt/c16t2d0BESTb /dev/rmt/c16t2d0BESTnb
tape 10 0/5/1/0/4/0.220.1.255.3.3.0 stape NO_HW DEVICE HP Ultrium 4-SCSI
/dev/rmt/10m /dev/rmt/10mn /dev/rmt/c18t3d0BEST /dev/rmt/c18t3d0BESTn
/dev/rmt/10mb /dev/rmt/10mnb /dev/rmt/c18t3d0BESTb /dev/rmt/c18t3d0BESTnb
tape 11 0/5/1/0/4/0.220.1.255.3.4.0 stape NO_HW DEVICE HP Ultrium 4-SCSI
/dev/rmt/11m /dev/rmt/11mn /dev/rmt/c18t4d0BEST /dev/rmt/c18t4d0BESTn
/dev/rmt/11mb /dev/rmt/11mnb /dev/rmt/c18t4d0BESTb /dev/rmt/c18t4d0BESTnb
glidden #
To check the Linux Tape Drive Issues:
dcs-lnx-nbu-med2 # lsmod |grep st
st 72933 14
ql2300_stub 372724 0
usb_storage 122529 0
scsi_mod 196953 9 p,scsi_dh,st,sg,usb_storage,qla2xxx,scsi_transport_fc,cciss,sd_mod
dcs-lnx-nbu-med2 # lsmod |grep sg
sg 70377 0
scsi_mod 196953 9 emcp,scsi_dh,st,sg,usb_storage,qla2xxx,scsi_transport_fc,cciss,sd_mod
dcs-lnx-nbu-med2 #
dcs-lnx-nbu-med2 # cat drive_TLD20_Drive112
MODE = 2
TIME = 1353318700
MASTER = glidden
SR_KEY = 0 1
PATH = /dev/nst18
REQID = -1350811059
ALOCID = 50198872
RBID = {B711FD22-322E-11E2-9F84-001E0BFDD20E}
PID = 11369
FILE = /usr/openv/netbackup/db/media/tpreq/drive_TLD20_Drive112
DONE
_Drive112
DONE
dcs-lnx-nbu-med2 # ls -ltr /usr/openv/netbackup/db/media/tpreq/drive_TLD20_Drive112
ls: /usr/openv/netbackup/db/media/tpreq/drive_TLD20_Drive112: No such file or directory
dcs-lnx-nbu-med2 # ls -ltr /dev/nst19
crw——- 1 root disk 9, 147 Oct 11 07:57 /dev/nst19
dcs-lnx-nbu-med2 # ls -ltr /dev/nst20
crw——- 1 root disk 9, 148 Oct 11 07:57 /dev/nst20
dcs-lnx-nbu-med2 # dmesg
Sticky Bit Permissions to let everyone to run commands:
-r-sr-sr-t
Small (s) – Execute
Cap (S) – No Execute
First s – SUID – 4
Second s – SGID – 2
t – 1
Total – 7
-r-sr-sr-t
r – 4
s(x) – 1
Total 555
volt# ls -ltr /usr/openv/volmgr/bin/vmchange
-r-sr-sr-t 1 root bin 621368 Feb 3 2011 /usr/openv/volmgr/bin/vmchange
volt# ls -ltr /usr/openv/netbackup/bin/bpadm
-rwxr-xr-x 1 root bin 452928 Feb 3 2011 /usr/openv/netbackup/bin/bpadm
volt# chmod 7555 /usr/openv/netbackup/bin/bpadm
volt# ls -ltr /usr/openv/netbackup/bin/bpadm
-r-sr-sr-t 1 root bin 452928 Feb 3 2011 /usr/openv/netbackup/bin/bpadm
volt#
To Start TSm Client Services:
[glerpd42]# pwd
/etc
[glerpd42]# cat inittab |grep dsm
tsm1::once:/usr/bin/dsmc sched -server=gltsmd12 >/dev/null 2>&1 #TSM Scheduler.
[glerpd42]#
[glerpd42]# nohup /usr/bin/dsmc sched -server=gltsmd12 >/dev/null 2>&1 &
[1] 35651596
[glerpd42]#
Command to grep client name in Avamar
mccli client show –recursive=true |grep -i ‘DCA-CX-86’ |awk ‘{print $2}’
To Add NFS export on Linux Servers:
–>Edit /etc/exports and place line as below
/usr/openv *(ro,sync)
- – Means all server can mount this
ro – readonly
rw – read and write
–>exportfs -a
this command reread export file completly(exportfs -r – will read only modified lines)
—>exportfs
this commmand enables that
exportfs
/usr/openv <world>
–> to rerun on NFS
chkconfig nfs on
To check memory usage in HP UX Server – Command:
swapinfo -tam
To stop the pbx_exchange daemon:
/opt/VRTSpbx/bin/vxpbx_exchanged stop
To start the pbx_exchange daemon:
/opt/VRTSpbx/bin/vxpbx_exchanged start
Cron file timing: – Crontab
- * * * * command to be executed
- – – – –
| | | | |
| | | | +—– day of week (0 – 6) (Sunday=0)
| | | +——- month (1 – 12)
| | +——— day of month (1 – 31)
| +———– hour (0 – 23)
+————- min (0 – 59)
tar and gzip commands:
tar cvf Dlinklogs_INC1185457262. /tmp/Dlinklogs_INC1185457262/
gzip Dlinklogs_INC1185457262.tar
zcat file.tar.Z | tar xvf – – un compress tar.z file
gunzip -c NetBackup_7.0_Solaris_Sparc64_GA.tar.gz | tar xvf –
du -skh /usr/openv/netbackup/db/* – Command to get Folder/Directory Size
du -sk /usr/openv/netbackup/db/images/* > /tmp/catsize.out
##########################################
Sybase SQL Anywhere server management
Upon startup, the Sybase SQL Anywhere server uses the SQL Anywhere daemon to set the server parameters in the server.conf file. Then, the daemon starts the databases that are indicated in the databases.conf file.
¦ /usr/openv/db/bin/nbdbms_start_server ndbms_start_server – Starts the SQL Anywhere server if no option is specified.
¦ /usr/openv/db/bin/nbdbms_start_server -stop -f – Stops the server; -f forces a shutdown with active connections.
¦ /usr/openv/db/bin/nbdbms_start_server -stat – The -stat option tells whether the server is up or down:
SQL Anywhere Server Ping Utility Version 11.0.1.2044 Ping server successful.
##########################################
NetBackup catalog resides on the NetBackup master server consists of following:
• The image database. The image database contains information about the data that has been backed up. It is the largest part of the catalog.
• NetBackup data that is stored in relational database files. The data includes media and volume data describing media usage and volume
information, which is used during the backups.
• NetBackup configuration files. The configuration files (databases.conf and server.conf) are flat files that contain instructions for the SQL Anywhere daemon.
IMAGE DATABASE:
• Image database is located at /usr/openv/netbackup/db/images and contains the following files:
¦ Image files (files that store only backup set summary information)
- Each image file is an ASCII file, generally less than 1 kilobyte in size. An image file contains only backup set summary information. For example, the backup ID, the backup type, the expiration date, fragment information, and disaster recovery information.
¦ Image .f files (files that store the detailed information of each file backup)
- The binary catalog can contain one or more image .f files. This type of file is also referred to as a files-file. The image .f file may be large because it contains the detailed backup selection list for each file backup. Generally, image files range in size from 1 kilobyte to 10 gigabytes.
(*) Image .f file single file layout
NetBackup stores file information in a single image.f file if the information for the catalog is less than 4 megabytes.
(*) Image .f file multiple file layout
When the file information for one catalog backup is greater than 4 megabytes, the information is stored in multiple .f files: one main image .f file plus nine additional .f files. Separating the additional .f files from the image .f file and storing the files in the catstore directory improves performance while writing to the catalog.
RELATIONAL DATABASE:
NetBackup installs Sybase SQL Anywhere during the master server installation as a private, non-shared server for the NetBackup database. Also known as the Enterprise Media Manager (EMM) database, the NetBackup database (NBDB) contains information about volumes and the robots and drives that are in NetBackup storage units.
¦ Database files
¦ /usr/openv/db/data/BMRDB.db (if BMR is installed)
¦ /usr/openv/db/data/BMRDB.log (if BMR is installed)
¦ /usr/openv/db/data/BMR_DATA.db (if BMR is installed)
¦ /usr/openv/db/data/BMR_INDEX.db (if BMR is installed)
¦ /usr/openv/db/data/DARS_DATA.db
¦ /usr/openv/db/data/DARS_INDEX.db
¦ /usr/openv/db/data/DBM_DATA.db
¦ /usr/openv/db/data/DBM_INDEX.db
¦ /usr/openv/db/data/NBDB.db
¦ /usr/openv/db/data/EMM_DATA.db
¦ /usr/openv/db/data/EMM_INDEX.db
¦ /usr/openv/db/data/NBDB.log
CONFIGURATION FILES:
¦ /usr/openv/db/data/vxdbms.conf
¦ /usr/openv/var/global/server.conf
¦ /usr/openv/var/global/databases.conf
##########################################
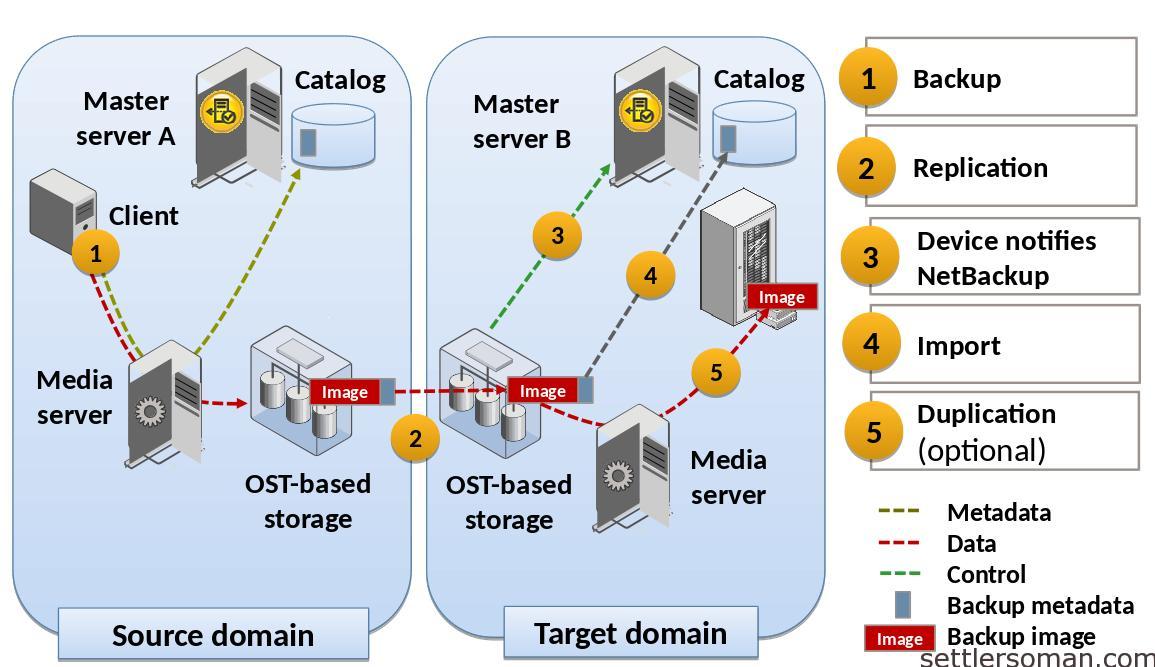
AIR – Auto Image Replication
Auto Image Replication is to create off-site copies of mission critical backups to protect against site loss
Step 1 – The backup is written to disk storage in the source domain using a backup policy with an SLP configured for Auto Image Replication. When the backup completes the catalog data it generates is appended to the end of the backup.
Step 2 – the backup is duplicated to the target domain across the WAN (or LAN)
Step 3 – the storage device in the target domain alerts the target master server to the fact that a backup has been duplicated to it. This triggers the receiving SLP to run a “fast import” operation in which the catalog data transferred from the source domain is added to the target domain’s catalog.
Step 4 – the receiving SLP in the target domain can now duplicate the received backup to any desired location for storage – such as creating a tape for long term retention.
##########################################
RIP – Real time protection
RIP is used to create duplicate writes of data to two destinations – so it is “Real Time” copy. AIR is used with a Storage Lifecycle Policy to replicate data that has been written to primary storage and it works “after” the data is written – so there can be a lag time (backlog) of hours or even days depending on the environment and bandwidth.
So in the end, you get two copies of the data, but RTP is done immediately, AIR is done when there are cycles in the infrastructure.
$$$$$$$$$$$$$$$$$$$$$$$$$$$$$$$$$$$$$$$$$$
Designing your backup system:
The planning and configuration examples that follow are based on standard and ideal calculations. Your numbers can differ based on your particular environment, data, and compression rates.
After an analysis of your backup requirements, you can begin designing your backup system. The table below summarizes the steps to completing a design for your backup system.
Step 1 : Calculate the required data transfer rate for your backups. Calculate the rate of transfer your system must achieve to complete a backup of all your data in the time available.
Step 2 : Calculate how long it takes to back up to tape or disk. Determine what kind of tape or disk technology meets your needs.
Step 3 : Calculate the required number of tape drives. Determine how many tape drives are needed.
Step 4 : Calculate the required data transfer rate for your network(s). For backups over a network, you must move data from your client(s) to your media server(s) fast enough to finish backups within your backup window.
Step 5 : Calculate the size of your NetBackup image database. Determine how much disk space is needed to store your NetBackup image database.
Step 6 : Calculate the size of the NetBackup relational database (NBDB). Determine the space required for NBDB.
Step 7 : Calculate media needed for full and incremental backups. Determine how many tapes are needed to store and retrieve your backups.
Step 8 : Calculate the size of the tape library needed to store your backups. Determine how many robotic library tape slots are needed to store all your backups.
Step 9 : Design your master server. Use the previous calculations to design and configure a master server.
Step 10 : Estimate the number of master servers needed.
Step 11 : Estimate the number of media servers needed.
Step 12 : Design your OpsCenter server.
Step 14 : Review a summary of these steps.
$$$$$$$$$$$$$$$$$$$$$$$$$$$$$$$$$$$$$$$$$$
TCP/IP Network Buffer Size:
/usr/openv/netbackup/NET_BUFFER_SZ is a file containing a number indicating the TCP/IP socket buffer size that should be used for data transfers between the NetBackup media server and its clients. If the file does not exist, the default value used is 32032 bytes
- echo “262144” > /usr/openv/netbackup/NET_BUFFER_SZ
- cat /usr/openv/netbackup/NET_BUFFER_SZ
262144
#
NET_BUFFER_SZ_REST – is for Network Restores
Data Buffer Size and Number of Data Buffers:
The NetBackup media server uses shared memory to buffer data between the network and the tape drive (or between the disk and the tape drive if the NetBackup media server and client are the same system). By default, NetBackup uses a default value of 8 x 32KB shared memory buffers for non-multiplexed backups and 4 x 64KB for a multiplexed backup.
These buffers can be configured by creating the files /usr/openv/netbackup/db/config/SIZE_DATA_BUFFERS and /usr/openv/netbackup/db/config/NUMBER_DATA_BUFFERS on the NetBackup media server.
The SIZE_DATA_BUFFERS file should contain a single line specifying the data buffer size in bytes in decimal format.
The NUMBER_DATA_BUFFERS file should contain a single line specifying the number of data buffers in decimal format.
IMPORTANT: Because the data buffer size equals the tape I/O size, the value specified in SIZE_DATA_BUFFERS must not exceed the maximum tape I/O size supported by the tape drive or operating system. This is usually 256 KB or 128 KB.
- echo “262144” > /usr/openv/netbackup/db/config/SIZE_DATA_BUFFERS
- echo “16” > /usr/openv/netbackup/db/config/NUMBER_DATA_BUFFERS
- cat /usr/openv/netbackup/db/config/SIZE_DATA_BUFFERS
262144
- cat /usr/openv/netbackup/db/config/NUMBER_DATA_BUFFERS
16
#
$$$$$$$$$$$$$$$$$$$$$$$$$$$$$$$$$$$$$$$$$$
Generate Test data for backup, duplications, verifies, restores, etc,.
A need was identified to provide a means of generating test data to process through NetBackup.
- This data should be: Repeatable and controllable.
- As ‘light-weight’ as possible during generation.
- Indistinguishable from regular data, to allow for further processing, such as duplications, verifies, restores, etc.
- A set of file list directives are available to control the size, number, compressibility, and delivery rate of data through a Standard NetBackup policy.
- These directives can be used to create data in any profile that is desired, with little to no impact on the client machine.
- The client’s network will be impacted, just like a regular backup, unless the client is also the media server.
- The images that are created are standard images, and can be verified, imported, duplicated and restored.
- UNIX/Linux clients only, in a Standard NetBackup policy.
- Client encryption may be used, but not client compression.
- Since no actual data is being used for the backup, restores will not produce any files.
- This will generate real images, using up storage space, and should be dealt with accordingly, i.e. expired, removed, etc.
NEW_STREAM
GEN_DATA
GEN_KBSIZE=100
GEN_MAXFILES=100
GEN_PERCENT_RANDOM=50
NEW_STREAM
GEN_DATA
GEN_KBSIZE=100
GEN_MAXFILES=100
GEN_PERCENT_RANDOM=60
GEN_FILENAME_OFFSET=100
NEW_STREAM
$$$$$$$$$$$$$$$$$$$$$$$$$$$$$$$$$$$$$$$$$$
Adjusting Batch Size for sending MetaData to the Catalog:
• Can be used to tune problems with backing up file systems with many files and also file adds into catalog exceeding bpbrm timeout
•/usr/openv/netbackup/MAX_FILES_PER_ADD – affects all backups, default is 5,000
•/usr/openv/netbackup/FBU_MAX_FILES_PER_ADD – affects FlashBackup, default is 95,000
•/usr/openv/netbackup/CAT_BU_MAX_FILES_PER_ADD – affects catalog backups, default is maximum allowed 100,000
$$$$$$$$$$$$$$$$$$$$$$$$$$$$$$$$$$$$$$$$$$
SAN Client Tuning:
• On FT media servers, using a NUMBER_DATA_BUFFERS above 16 may not yield performance improvements and may cause backup failures.
• Use NUMBER_DATA_BUFFERS_FT to set this value for just FT backups. The default is 16 for tape and 12 for disk.
$$$$$$$$$$$$$$$$$$$$$$$$$$$$$$$$$$$$$$$$$$
Tuning nbrb for Resource Utilization:
• The NetBackup Resource Broker handles granting resources to backup, restore and duplications.
• nbrb.conf settings are moved into EMM in 7.1 and above and nbrbutil –listSettings is used to view them.
• These setting should be reviewed after upgrading to 7.1, paying special attention to RESPECT_REQUEST_PRIORITY and DO_INTERMITTENT_UNLOADS .
• BREAK_EVAL_ON_DEMAND is a relatively new setting and should also be considered
$$$$$$$$$$$$$$$$$$$$$$$$$$$$$$$$$$$$$$$$$$
Tuning server.conf Part I
c – Indicates the initial memory that is reserved for caching database pages and other server information
ch – Indicates the maximum cache size, as a limit to automatic cache growth
cl – Indicates the minimum cache size, as a limit to automatic cache resizing.
govan # cat /usr/openv/var/global/server.conf
-n NB_govan-bk
-x tcpip(LocalOnly=YES;ServerPort=13785) -gp 4096 -gd DBA -gk DBA -gl DBA -ti 0 -c 500M -ch 1G -cl 500M -zl -os 1M -o /usr/openv/db//log/server.log
-ud
Recommended change:
govan # cat /usr/openv/var/global/server.conf
-n NB_govan-bk
-x tcpip(LocalOnly=YES;ServerPort=13785) -gp 4096 -gd DBA -gk DBA -gl DBA -ti 0 –gn 40 -c 1G -ch 4G -cl 1G -zl -os 1M -o /usr/openv/db//log/server.log
-ud
Tuning server.conf Part II
gn – Indicates the number of requests the database server can handle at one time. This parameter limits the number of threads upon startup.
Tuning server.conf Part III
m – truncate and commits the NBDB tlog
- The transactions logs in nbdb.log can grow quite large and eventually cause issues with NBU operations. This typically only happens if catalog backups are not performed for an extended period but can also happen if the system is very busy.
- To prevent this transaction log growth a –m option can be added at the end of server.conf after the –ud option on the last line. This automatically truncates and commits the tlogs when a checkpoint is done many times a day.
$$$$$$$$$$$$$$$$$$$$$$$$$$$$$$$$$$$$$$$$$$
Tuning emm.conf
• UNIX: /usr/openv/var/global/emm.conf is the configuration file used by nbemm the Enterprise Media Manager.
• With the default settings in emm.conf (or with the file not present) even a number of admins opening the Device Manager in the GUI or running commands can exceed the number of connections. The default for DB browse connections is only 3 and DB connections is 4!
• For large environments the following settings are recommended as a minimum
NUM_DB_BROWSE_CONNECTIONS=20
NUM_DB_CONNECTIONS=21
NUM_ORB_THREADS=31
• This makes it important that the the emm db in /usr/openv/db/data is on really fast disk and often times it is advisable to have it on separate disk from the image catalog and any logging.
$$$$$$$$$$$$$$$$$$$$$$$$$$$$$$$$$$$$$$$$$$
Disk Layout Considerations
• Setting up separate file systems/disk spindles for the following components will improve the performance on large masters.
1. Unified logs
2. Catalog flat file components (in particular the image database)
3. Catalog relational database data files
4. Catalog relational database index files
5. Catalog relational database transaction logs
• Consider SSD for relational databases which are relatively small
• Put databases and log files on a Raid protected file system with the right balance of performance and redundancy.
$$$$$$$$$$$$$$$$$$$$$$$$$$$$$$$$$$$$$$$$$$
Linux Media Server Fine tuning:
• Increase the number of file descriptors to at least 8192 and again 65536 is recommended with 7.5. Use ulimit –a to determine the current limit. This can be raised in /etc/security/limits.conf
- hard nofile 65536 (can be tuned to unlimited as well)
- soft nofile 65536
• Increase the amount of shared memory available for NBU, especially on media servers by editing /etc/sysctl.conf and adding or modifying
kernel.shmmax= half or more of physical RAM.
• These minimums are also required for other kernel parameters, often customers with busy master/media servers end up with higher values.
Message Queues Semaphores
msgmax=65536 semmsl = 300
msgmnb=65536 semmns = 1024
Msgmni=16384 semopm = 32
semmni = 1024
$$$$$$$$$$$$$$$$$$$$$$$$$$$$$$$$$$$$$$$$$$
Bare Metal Restore – How to
1. BMR master setup – creates BMRDB – “bmrsetupmaster”
2. Configure Backup policy with BMR option and complete the backup
3. Configure Boot Server – can be configured on any client machine.
“bmrsetupboot -register”
4. Create SRT – Shared resource tree is the minimal bootable environment needed. its basically Windows P OS. Only one needed per bit version.
- wim – image format – bootable image get created
- you also add NBU package to build into the wim image
- you can also add Maintenance pack details(7.1.0.1) by going through modify SRT.
5. Booting the SRT – using PXE boot or CD boot
To configure PXE, PXE configuration wizard
6. In case you do DSR(Dissimilar Server restore), you need to run discover step to discover the destination server hardware details.
- Create a editable copy of the current configuration.
- change the destination IP.
- start – “prepare to discover” with keeping a name to it.
- boot the destination host with PBX boot/CD image, destination client will start sending its configuration details to BMR server.
- once this is done, you will be seeing the configuration of destination server in the discovered configuration.
- Now change the discovered configuration, initialize the device drivers, network interfaces and volumes. this will remove all old configuration of old server and add only things needed for destination server. change disk configuration as needed
7. Start “Prepare to restore state”
reboot the destination server for restore
establish restore environment
partition disks
format disks
restore files
finalize restore
8. After restore completes and reboot
cleanup process
install NIC driver
detecting and completing DSR
remove temp files
update system state
check for external procedure
finalize restore
manually import foreign disks
Processes involved in BMR
bmrd – Bare Metal Restore master
bmrbd – BMR boot server
bmrsavecfg – Bare Metal Restore the agent that runs on client systems, collects the client configuration, and saves the client configuration to the master server.
bmrc – Bare Metal Restore the utility that clients use to communicate with the BMR master server during a restore. Runs on the restoring client.
$$$$$$$$$$$$$$$$$$$$$$$$$$$$$$$$$$$$$$$$$$
The NOexpire touch file is not intended for long term purposes. It is recommended only to use the NOexpire touch file for a short time period as in a maintenance window. There is no published Symantec documentation recommending to keep this touch file in place for extended periods of time. The best solution to prevent images from expiring is to use the bpexpdate command to extend the image expiration date(s) prior to the image’s expiration date.
The NOexpire touch file only prevents automatic/internal NetBackup image and tape cleanup from occurring. It does not prevent users or scripts from manually expiring images and tapes. Images and tapes will still expire if bpexpdate is manually run or run via a script.
How the touch file works:
The touch file prevents bpsched or nbpem from executing bpexpdate -deassignempty and from executing bptm -delete_expired and from executing bpimage -cleanup.
By default, bpimage -cleanup is run every 12 hours and at the end of an nbpem session. The Image cleanup interval can be tailored in the Clean-up section of the Master server’s Host Properties. bptm -delete_expired is used to clean the media db every ten minutes (or bpsched wake-up interval or Policy Update interval). It deassigns all tapes containing expired images. It does not clean up tapes with rogue fragments such as those from a failed backup. The bpexpdate -deassignempty will clean all expired and invalid fragments and deassign tapes as necessary.
To create the touch file:
On UNIX:
- touch /usr/openv/netbackup/bin/NOexpire on the master server.
On Windows:
<install path>\Netbackup\bin\NOexpire Ensure that the file on Windows does not have a file extension.
$$$$$$$$$$$$$$$$$$$$$$$$$$$$$$$$$$$$$$$$$$
bp.conf options for UNIX clients
1. The main bp.conf file is located in the following location:
/usr/openv/netbackup/bp.conf
NetBackup uses internal software defaults for all options in the bp.conf file, except SERVER. During installation, NetBackup sets the SERVER option to the name of the master server where the software is installed.
See SERVER bp.conf entry for UNIX servers.
If a UNIX system is both a client and a server, both the server and the client options are in the /usr/openv/netbackup/bp.conf file.
Note:
The SERVER option must be in the /usr/openv/netbackup/bp.conf file on all NetBackup UNIX clients. It is also the only required entry in this file.
2. Each nonroot user on a UNIX client can have a personal bp.conf file in their home directory as follows:
$HOME/bp.conf
The options in personal bp.conf files apply only to user operations. During a user operation, NetBackup checks the $HOME/bp.conf file before /usr/openv/netbackup/bp.conf.
Root users do not have personal bp.conf files. NetBackup uses the /usr/openv/netbackup/bp.conf file for root users.
Note:
To change these options on non-UNIX clients, use either the client-user interface or in a configuration file, depending on the client. For instructions, see the online Help in the Backup, Archive, and Restore client interface.
$$$$$$$$$$$$$$$$$$$$$$$$$$$$$$$$$$$$$$$$$$
Oracle – RMAN Configuration
1. Install client software on the Oracle DB Server
2. API Library Linking
- Automatic Linking – /usr/openv/netbackup/bin/oracle_link
- Manual Linking – ln -s /usr/openv/netbackup/bin/libobk.so64.1 /usr/openv/netbackup/bin/libobk.so and su – oracle, cd $ORACLE_HOME/lib(64), ln -s /usr/openv/netbackup/bin/libobk.so libobk.so
- Oracle should be shutdown prior to making the link, or re-started after the link is created
3. Create RMAN Script
4. Configure Oracle Type Policy on NBU end and configure the Backup selection as that RMAN Script
Oracle – RMAN Troubleshooting
- DB Side Backup Logs
- “cd /XXXXX/dba/xxxxxx/backups/<DATABASE-SID-NAME>/log”
- NBU Side Backup Logs
- bpdbsbora, bporaexp, bporaimp, dbclient, bphdb
$$$$$$$$$$$$$$$$$$$$$$$$$$$$$$$$$$$$$$$$$$
Enabling automatic path correction
You can configure NetBackup to automatic device path correction. To do so, use the following procedure.
To configure automatic path correction
Use a text editor to open the following file:
install_path\VERITAS\Volmgr\vm.conf
Add the following AUTO_PATH_CORRECTION entry to the file:
AUTO_PATH_CORRECTION = YES
If it already exists but is set to NO, change the value to YES.
Save the file and exit the text editor.
- Adding either ENABLE_AUTO_PATH_CORRECTION or AUTO_PATH_CORRECTION = YES to the vm.conf file accomplishes the same thing. There is no difference between these two vm.conf settings. See one of the above mentioned guides (links provided in the Related Documents section below) for more information on the settings.
$$$$$$$$$$$$$$$$$$$$$$$$$$$$$$$$$$$$$$$$$$
SAN Media Server
Designed for customers who would prefer to utilize their storage area network (SAN) for backup operations instead of their local area network (LAN). This feature enables LANfree data protection with high-performance access to shared resources.
A SAN Media Server is directly connected to the SAN, and is used to backup data directly to disk or tape. A SAN Media Server is unable to backup or manage clients. It only able to backup what is directly attached or mounted to it.
SAN Client
Offloads backup traffic from the LAN and allows for fast backups over the SAN at approximately 150 MB/sec. The SAN client can send data to a variety of NetBackup disk options and allows you to back up and restore to disk over the SAN. Data is sent to media servers via SCSI commands over the SAN rather than TCP/IP over the LAN to optimize performance.
SAN Client’s send their data to a Fibre Transport (FT) Media Server.
To implement the SAN Client, the user needs to deploy a Fiber Channel based SAN between the client and the Media Server. The Server and Clients can each have multiple SAN ports zoned together. In the current release, the feature also requires using disk based storage, preferably Flexible Disk or OpenStorage, for the backend.
$$$$$$$$$$$$$$$$$$$$$$$$$$$$$$$$$$$$$$$$$$
Tunings can be done in EMM.CONF file – /usr/openv/var/global/emm.conf
Beginning in NetBackup 6.0 Maintenance Pack 3 (MP3), nbemm will check for disk full conditions and call nbdb_admin -stop if this condition is encountered. This helps to prevent potential corruption in the Enterprise Media Manager (EMM) database due to the disk filling up.
The default time interval for nbemm to check for “disk full” is 5 minutes, and disk full is defined as 1% by default.
Defaults can be changed in the emm.conf file in the following location on the EMM server:
UNIX: /usr/openv/var/global
Windows: <install_path>\NetBackup\var\global
PERCENT_FREE_DISK=3.45
DISK_MB_AVAILABLE=500
DISK_CHECK_INTERVAL=120
$$$$$$$$$$$$$$$$$$$$$$$$$$$$$$$$$$$$$$$$$$
databases.conf – What is What
The /usr/openv/var/global/databases.conf configuration file contains the locations of the main database files and the database names for automatic startup when the SQL Anywhere daemon is started. For example, if NBDB and BMRDB are both located on the master server in the default locations, databases.conf contains:
“/usr/openv/db/data/NBAZDB.db” -n NBAZDB
“/usr/openv/db/data/NBDB.db” -n NBDB
“/usr/openv/db/data/BMRDB.db” -n BMRDB
$$$$$$$$$$$$$$$$$$$$$$$$$$$$$$$$$$$$$$$$$$
server.conf – What is What
server.conf is read when the SQL Anywhere service is started. The SQL Anywhere service gets all configuration information from this file:
-n NB_server_name -x tcpip(LocalOnly=YES;ServerPort=13785) -gd DBA
-gk DBA -gl DBA -gp 4096 -ti 0 -c 25M -ch 500M -cl 25M -zl -os 1M -o
“C:\Program Files\Veritas\NetBackupDB\log\server.log”
In this example, server_name indicates the name of the SQL Anywhere server. Each Sybase server has a unique name. Use the same name that was used during installation. If a fully qualified name was used at that time, use a fully qualified name here.
-gd DBA -gk DBA -gl DBA – Indicates that the DBA user is the account used to start, stop, load, and unload data.
-gp 4096 – Indicates the maximum page size (in bytes) for the database. This parameter is given during database creation.
-c 25M – Indicates the initial memory that is reserved for caching database pages and other server information
-ch 500M – Indicates the maximum cache size, as a limit to automatic cache growth.
-cl 25M – Indicates the minimum cache size, as a limit to automatic cache resizing.
-gn 10 – Indicates the number of requests the database server can handle at one time.
$$$$$$$$$$$$$$$$$$$$$$$$$$$$$$$$$$$$$$$$$$
[root@govan ~]# cat /usr/openv/db/data/vxdbms.conf
VXDBMS_NB_SERVER = NB_govan-bk
VXDBMS_NB_REMOTE_SERVER = NB_govan-bk
VXDBMS_NB_PORT = 13785
VXDBMS_NB_DATABASE = NBDB
VXDBMS_AZ_DATABASE = NBAZDB
VXDBMS_NB_DATA = /usr/openv/db/data
VXDBMS_NB_INDEX = /usr/openv/db/data
VXDBMS_NB_TLOG = /usr/openv/db/data
VXDBMS_NB_STAGING = /usr/openv/db/staging
VXDBMS_NB_PASSWORD = 5021c6c404395d128b1c27a6179e53e392da541766956efd
AZ_DB_PASSWORD = Jj8mkP3sKTo=
VXDBMS_NB_FULL_KEYWORD = NBDB:112369:1394564404:F
VXDBMS_NB_INCREMENTAL = NBDB.log.1
VXDBMS_AZ_INCREMENTAL = NBAZDB.log.1
VXDBMS_BACKUP_POLICY = HOT_DB_CATALOG
VXDBMS_BACKUP_SCHEDULE_TYPE = 0
[root@govan ~]#
$$$$$$$$$$$$$$$$$$$$$$$$$$$$$$$$$$$$$$$$$$
Testing Backups to Tape device directly to identify the read and write throughput:
We are facing BCV backup performance issue in dca-lnx-bcv-svr2 server and observed that all SAN disks read performance is poor. Local Disks are giving good throughput.
Used DD command to test disk read speed. Request you to validate this server configuration and share the findings.
VxFS file system
[root@dca-lnx-bcv-svr2 # time dd if=/dev/vx/dsk/srmp17sddg04/db2p17log_activevol of=/dev/nst9 obs=262144
^C1914081+0 records in
3738+0 records out
979894272 bytes (980 MB) copied, 49.4238 s, 19.8 MB/s
real 0m49.427s
user 0m0.275s
sys 0m3.894s
Local Disk ( /usr/openv – ext4)
[root@dca-lnx-bcv-svr2 # time dd if=/dev/mapper/VolGroup00-usr of=/dev/nst9 obs=262144
24772608+0 records in
48384+0 records out
12683575296 bytes (13 GB) copied, 70.853 s, 179 MB/s
real 1m10.856s
user 0m3.614s
sys 0m28.162s
Linux side two findings there comparing to production systems.
1. VxFS – File system mount option cio is missing on the BCV server.
2. Swap space is low.
[root@dca-lnx-bcv-svr2 /]# free -m
total used free shared buffers cached
Mem: 129022 127142 1879 0 376 119349
-/+ buffers/cache: 7417 121605
Swap: 1023 0 1023
[root@dca-lnx-bcv-svr2 /]# grep swap /etc/fstab
UUID=bd40b91e-8524-4474-9552-c13aca360c8d swap swap defaults 0 0
[root@dca-lnx-bcv-svr2 /]# swapon -s
Filename Type Size Used Priority
/dev/sda2 partition 1048568 0 -1
$$$$$$$$$$$$$$$$$$$$$$$$$$$$$$$$$$$$$$$$$$
Offline Until option change in the Client Attributes tab
Instead of removing the client from potentially multiple policies, another option is to disable the client for a specific period via the Admin GUI.
Host Properties -> Master servers -> <master_server hostname> -> Client Attributes
Select “Add” and enter the client name. Click the tick box “Offline until:” this allows you to specify a date and time in the future.
Example:
Selection to offline a client for until 28th February 2012 at 12:00 mid day
/usr/openv/netbackup/db/client/<clientname> directory on the Master server, creates the following files:
-rw——- 1 root root 0 Feb 26 11:15 CO_1
-rw——- 1 root root 0 Feb 26 11:15 OA_1330430400
/usr/openv/netbackup/bin/bpdbm -ctime shows:
1330430400 = Tue Feb 28 12:00:00 2012 This is the date the client will become active again!
When the offline until date expires (or if the box within Client Attributes is unchecked ) the files change:
-rw——- 1 root root 0 Feb 26 11:17 CO_0
-rw——- 1 root root 0 Feb 26 11:17 OA_0
$$$$$$$$$$$$$$$$$$$$$$$$$$$$$$$$$$$$$$$$$$
To check the HBA Status on Linux Server
sc-bkp-lnx01 # cat /sys/class/fc_host/*/port_state
Online
Online
Online
Online
sc-bkp-lnx01 # cat /sys/class/fc_host/*/port_type
NPort (fabric via point-to-point)
NPort (fabric via point-to-point)
NPort (fabric via point-to-point)
NPort (fabric via point-to-point)
sc-bkp-lnx01 # cat /sys/class/fc_host/*/symbolic_name
QMH2462 FW:v5.03.16 DVR:v8.03.07.03.05.07-k
QMH2462 FW:v5.03.16 DVR:v8.03.07.03.05.07-k
QMH2462 FW:v5.03.16 DVR:v8.03.07.03.05.07-k
QMH2462 FW:v5.03.16 DVR:v8.03.07.03.05.07-k
$$$$$$$$$$$$$$$$$$$$$$$$$$$$$$$$$$$$$$$$$$
Direct Access Recovery (DAR)
NetBackup uses Direct Access Recovery (DAR) to restore a directory or individual files from a backup image. DAR can greatly reduce the time it takes to restore files and directories. DAR is enabled by default (no configuration is required).
DAR enables the NDMP host to position the tape to the exact location of the requested file(s). It reads only the data that is needed for those files. For individual file restore, NetBackup automatically determines whether DAR shortens the duration of the restore. It activates DAR only when it results in a faster restore. Further details are available as to when DAR is used and how to disable it.
$$$$$$$$$$$$$$$$$$$$$$$$$$$$$$$$$$$$$$$$$$
Some Interview Questions:
Find a disk based image via the command line and then delete it ?
bpimmedia -disk_stu storage_unit_label
do you import an NBU image that has been written to a disk storage unit ?
same as a tape backup, if the image has expired but tape not overwritten you can import. Same is true with disk backup. – If the images have expired but the CLEANUP HAS NOT HAPPENED ON THE DISK yet, you can import them back in to create the image again.
$$$$$$$$$$$$$$$$$$$$$$$$$$$$$$$$$$$$$$$$$$
Methods to improve backup performance without adjusting VERITAS NetBackup ™ buffer files
Modifications within NetBackup:
-Disable all NetBackup logging.
-Disable Compression in the Policy Attributes. (Conversely enable Compression. The point is, you don’t want to have both software compression and hardware compression active simultaneously.)
-Disable intelligent disaster recovery (IDR) and true image restore (TIR) in the Policy Attributes. (NetBackup will spend extra cycles on these activities thereby causing the backup to last longer.)
-Disable Open Transaction Manager (OTM) and Volume Snapshot Provider (VSP). OTM and VSP will cause backups to last longer.
-If disabling OTM or VSP is not an option, consider moving the OTM or VSP cache file to a different drive letter. (If backing up the C:\ drive, locate the cache file on D:\ or vice versa.)
-Disable Job Tracker on each client machine. In NetBackup 4.5 and earlier, this can be done by removing it from the All Users Startup Group and killing the active process. In NetBackup 5.0 tracker starts through the registry. See TechNote 267253 on how to disable tracker in NetBackup 5.0. (Job Tracker is listed as tracker.exe in Task Manager. Job Tracker is designed for computers that are used as desktop workstations, to tell the users when a backup is active on their workstation. Consequently it is not needed on normal data center class servers.)
-In the Policy, change from using the directive “All Local Drives” to individual drive letters and system state. (In many situations, specifying drive letters produces quicker backups than using the All Local Drives directive.)
-Examine Exclude and Include Lists and eliminate them if possible. (NetBackup must process each of these lists and this will slow down the backup.)
Modifications Outside of NetBackup:
-Disable outbound Virus Scanning on all data sets being backed up
-Disable NT File System (NTFS) compression on all data sets being backed up
-Ensure that network communication is working optimally:
1. Verify that the network interface card’s (NIC’s) Hub/Switch ports are set to Fixed Duplexing and Fixed Speed rather then Auto-sense and Auto-negotiate.
2. Use FTP to transfer a large file (50 megabytes or more) from the media server to the client and back again. Time each operation. If moving the file in either direction is significantly longer then the other, there is a network problem.
-Try using Host files rather then relying on the domain name server (DNS) for name resolution (use extreme caution if doing this).
-Connect the tape drives onto different SCSI buses. For example: Assume 8 tape drives, 2 drives connected to each SCSI card requiring 4 total SCSI cards.
$$$$$$$$$$$$$$$$$$$$$$$$$$$$$$$$$$$$$$$$$$
Synthetic backup:-
It is a backup assembled from previous backups,the backup includes one previous traditional full backup & subsequent differential backup and/or cumulative incremental backup. The client need not be running to form the new full synthetic backup. The new full synthetic is an accurate representation of the client’s file system at the time of the most recent full backup.
The policy type must be either Standard or MS-Windows.
When a synthetic backup is scheduled , Netbackup starts the bysynth program to manage the synthetic backup process bpdm to cause tape & disk images to be read or written.
The Synthetic full backup contains the newest file at the front of the media and the unchanged files at the end (last file accessed order).
Synthetic backups can be written to tape storage units or disk storage units or a combination of both.
A synthetic backup must be created in a policy with the True Image Restore with Move Detection option selected.
A synthetic job is distinguished from a traditional full backup by the notation that is indicated in the Data Movement field of the Activity Monitor. Synthetic jobs display Synthetic as the Data Movement type while traditional backups display Standard.
Like a traditional backup, a synthetic backup is typically initiated by nbpem. Nbpem submits to nbjm a request to start the synthetic backup job. nbjm starts bpsynth. bpsynth controls the creation of the synthetic backup image and controls the reading of the files needed from the component images. bpsynth executes on the master server. If a directory named bpsynth exists in the debug log directory, additional debug log messages are written to a log file in that directory.
bpsynth makes a synthetic image in several phases:
Prepare catalog information and extents
Obtain resources
Copy data
Validate the image
How to create Synthetic backup policy:
Use the NetBackup interface to create a backup policy that includes full, incremental, and synthetic full backup schedules.
When you configure the backups, make sure to configure them in the following order:
On the Change Policy Wizard dialog box’s Attributes tab, check Collect true image restore information and check with move detection.
On the Add Schedule dialog box’s Attributes tab, check Synthetic backup.
On the Scheduling tab, make sure to configure the full backup and the incremental backup to run before the synthetic full backup schedule runs.
Benefits of Synthetic backup:
Reduces the network traffic – Network traffic is reduced because the files are transferred over the network only once.
It can reduce the number of tapes or disk space in use.
Synthetic backups can be created in the environments that are comprised exclusively of disk storage units.
Uses drives more effectively-The backups can be synthesized when drives are not generally in use. For Example; if the backup occurs primarily at night then drives can synthesize full backups during the day.
Differential incremental backup : A differential backup back up data that has changed since the last full or incremental backup.
Cumulative Incremental backup : A cumulative incremental backup backs up data that has changed since the last full backup.
$$$$$$$$$$$$$$$$$$$$$$$$$$$$$$$$$$$$$$$$$$
TIR with move detection :-
Normal backups do the following ..
Monday – files A, B and C are backed up in a full backup
Tuesday – file D is created and gets backed up by the incremental backup
Wednesday – file A is deleted – nothing new to backup
Thursday – File C gets moved to a different directory – gets backed up as considered a new file
Friday – server breaks – So you restore it all from full and incremental backups – when done you have restored file A, B and C from the full, D from the incr, C to a second location.
So you server doesnt really look like it did when it broke – you have a file back on it that was deleted plus one file in two locations.
So if you use TIR with Move detection you get the following:
Monday – files A, B and C are backed up and the TIR mapping taken
Tuesday – File D is backed up and a new TIR mapping taken
Wednesday – nothing to back up but new TIR mapping taken
Thursday – Nothing backed up as TIR realises that the file has just moved – new TIR mapping taken.
Friday – When you run the restore it looks at the latest TIR mapping so this time when you do the restores you get B, C only once in the latest location and D.
So now your server looks exactly like it did when it was last backed up
$$$$$$$$$$$$$$$$$$$$$$$$$$$$$$$$$$$$$$$$$$
“True Image” backup :-
A regular backup can backup and restore individual files. A “True Image” backup is a snapshot of files done at the directory level at a certain point in time. Additionally, when a “True Image” backup is restored, the directory restored will be brought to the same state as when it was backed up. Any files or sub-directories that did not exist at the time of backup will be deleted when the restore occurs if it is restored to the same location.
Turn on Move Detection when using True Image Recovery. Without Move Detection, TIR restores will not notice files that have moved within the filesystem (because they don’t change their modification time).
$$$$$$$$$$$$$$$$$$$$$$$$$$$$$$$$$$$$$$$$$$
Backup throughput calculations :-
10 MB per Sec
10*60 = 600 MB – 1 Min
600*60 = 36000 MB(36 GB) – 1 Hour
420 GB/36 GB = 11 Hours
$$$$$$$$$$$$$$$$$$$$$$$$$$$$$$$$$$$$$$$$$$
LTO – Linear Tape-Open :-
LTO Ultrium was developed as a replacement for DLT and has a similar design of 1/2-inch wide tape in a (slightly smaller) single reel cartridge. This made it easy for robotic tape library vendors to convert their DLT libraries into LTO libraries.
Attribute LTO-1 LTO-2 LTO-3 LTO-4 LTO-5 LTO-6 LTO-7 LTO-8
Release date 2000 2003 2005 2007 2010 Dec. 2012 TBA TBA
Native data capacity 100 GB 200 GB 400 GB 800 GB 1.5 TB 2.5 TB 6.4 TB 12.8 TB
Max uncompressed speed (MB/s) 20 40 80 120 140 160 315 472
Positioning times:
While specifications vary somewhat between different drives, a typical LTO-3 drive will have a maximum rewind time of about 80 seconds and an average access time (from beginning of tape) of about 50 seconds. Note that because of the serpentine writing, rewinding often takes less time than the maximum. If a tape is written to full capacity, there is no rewind time, since the last pass is a reverse pass leaving the head at the beginning of the tape.
Tape durability:
- 15 to 30 years archival.
- 5000 cartridge loads/unloads
- Approximately 260 full file passes. (One full pass is equal to writing enough data to fill an entire tape.)
Lifespan:
Regularly writing only 50% capacity of the tape results in half as many end-to-end tape passes for each scheduled backup, and doubles the tape lifespan.
Linear Tape File System:
The Linear Tape File System (LTFS) is a self-describing tape format and file system, which uses an XML schema architecture for ease of understanding and use.
It allows:
- Files and directories to appear on desktop and directory listings
- Drag-and-drop files to/from tape
- File level access to data
- Supports data exchange
With LTFS tape media can be used in a fashion like other removable media (USB flash drive, external hard disk drive, etc.). With LTFS the drive may behave like a disk (drive) but it is still a tape with serial access. Files are always appended to the end of the tape. If a file is removed from the listing the associated tape blocks used are not freed up, they are simply marked as unavailable. Data is only deleted if the whole tape is reformatted.
LTFS was first introduced with the IBM LTO Gen5 drive.
$$$$$$$$$$$$$$$$$$$$$$$$$$$$$$$$$$$$$$$$$$
Understanding how NetBackup writes to a tape :-
Understanding how NetBackup writes to tapes and what happens when images expire will help you better manage your tapes.
Tapes are linear – meaning that they write from the front to the back.
if we look at a tape.
BOT|day1image|day2image|blankspace|EOT
now the day1image expires on the tape – the assigned date does not change and you have this.
BOT|expiredimage|day2image|blankspace|EOT
if you try to write to this tape again it will ONLY write in the blankspace as tapes are Linear – meaning they can only append (tapes cannot write here and there like a disk can)
Now day2image expires – the assigned date of the tape goes blank – no assigned date
——-
Now look at it with multiplexing.
you use the tape – it gets an assigned date.
BOT|server1part1|server2part1|server1part2|server2part2|blankspace
if the backup for server1 fails or if the backup image expires then you have this
BOT|expiredimage|server2part1|expiredimage|server2part2|blankspace
remember tape is linear it cannot go back and write in those spaces where the failed image went.
So if a tape is full it cannot be written to again until ALL the images on the tape have expired.
expire the image and expire the tape are two different things.
when NetBackup goes to use a tape and mounts it, it gets assigned –
assigned means that NetBackup took a scratch tape with no assigned date and tried to use the tape today – does not mean that it wrote to it.
Now when NetBackup writes to the tape it gets an images ( this does not change the assigned date).
if the backup is good then the tape has an assigned date, and has a good images.
now say you use the SAME tape tomorrow – the assigned date does NOT change – but the tape does get a new image. So now you have this (no multiplexing)
BOT|day1image|day2image|blankspace|EOT
now the day1image expires on the tape – the assigned date does not change and you have this.
BOT|expiredimage|day2image|blankspace|EOT
if you try to write to this tape again it will ONLY write in the blankspace as tapes are Linear – meaning they can only append (tapes cannot write here and there like a disk can)
Now day2image expires – the assigned date of the tape goes blank – no assigned date
——-
Now look at it with multiplexing.
you use the tape – it gets an assigned date.
BOT|server1part1|server2part1|server1part2|server2part2|blankspace
if the backup for server1 fails or if the backup image expires then you have this
BOT|expiredimage|server2part1|expiredimage|server2part2|blankspace
remember tape is linear it cannot go back and write in those spaces where the failed image went.
so you do lose space on a tape when a backup fails or expires.
a tape will stay assigned until all images on the tape have expired.
so if you want the tape to be unassigned, you need to expire all the images on it.
Now expiring a tape has to do with the Physical tape.
Not everybody puts an expiration date on a tape.
If you only want to use a tape for 3 years then you can put a date on the tape that sets it for 3 years. After that date NetBackup will not longer use the tape to do backups on, but the tape can still be used for restores.
To see this you would right click on the media in the console.
that stuff at the top has to do with the expiration of the physical tape, people new to NetBackup quite often get this confused with expiring all the images on the tape.
Understanding how NetBackup writes to tapes and what happens when images expire will help you better manage your tapes.
From the Admin Guide:
“…
By default, NetBackup stores each backup on a tape volume that contains existing backups at the same retention level.
…
To mix retention levels on volumes, select Allow multiple retentions per media on the Media host properties.
…”
So, NetBackup will only re-use a FULL tape once all the images on it have expired. It won’t “fill in the gaps” created when images expire as it were.
As you’ve already intimated, if you can imagine a FULL tape with 800Gb of data on it where 799Gb of data is due to expire in a days time & 1Gb of data has an infinite retention then the tape will never be re-used (well not until sometime during 2038 that is!)
$$$$$$$$$$$$$$$$$$$$$$$$$$$$$$$$$$$$$$$$$$
Netbackup Manual Tar Recovery:
http://www.consorti.com/netbackup_manual_tar_recovery.html
http://www.backupcentral.com/wiki/index.php/How_do_I_restore_a_tape_using_just_the_%22tar%22_command%3F
1. Make sure that Netbackup is installed or the binaries are available from the Netbackup CD (specifically their commercial copy of a GNU-like tar).
2. Make sure you have a “media contents” report on the tape.
2.1. A complete Media Contents can come from the tape itself with the bpmedialist command
2.1.1. /usr/openv/netbackup/bin/admincmd/bpmedialist -U -mcontents -ev MEDIA_NUMBER
2.2. The real, physical layout of a netbackup tape is as follows
2.2.1. MH * BH Image * BH Image * BH Image * EH *
2.2.1.1. MH is the Media Header
2.2.1.2. * is a tape mark (used for fast forward and rewind)
2.2.1.3. BH is a Backup Header
2.2.1.4. Image is, well, the actual data
2.2.1.5. EH is the Empty Header (used for position validation)
2.3. An Images on Media report is VERY useful. This can only be gotten from the production Netbackup server’s data base. It will help you reconstruct full and incremental dumps. Without it, you must do some digging with the Media Contents report.
2.3.1. /usr/openv/netbackup/bin/admincd/bpimmedia -U -mediaid MEDIA_NUMBER
2.3.2. This report is normally printed out at WPG for disaster recovery information and included in offsite storage packages.
3. Load the media
3.1. If we are on a system with Netbackup, you must request the media!
3.1.1. (New for October 2002)It helps to expire the records in the Netbackup Database that match the tape:
/usr/openv/netbackup/bin/admincmd/bpexpdate -d 0 -ev MEDIA_NUMBER
3.1.2. /usr/openv/bin/tpreq -ev MEDIA_NUMBER -a r -d 8mm -p POOLNAME -f /tmp/tape
3.1.3. POOLNAME is usually WPGstandard, Offsite, or free (caps count)
3.1.4. /tmp/tape can be any new file name of your choice
3.2. If we are on a stand-alone system with no netbackup installed and the binaries (just /usr/openv/netbackup/bin/tar really) are available, just load the tape.
3.2.1(New for 2002!!!)You MUST refer to the device in the way that it was setup on Netbackup!
For example, at WPG we use compressed berkley blocks (as recommended by Veritas). We would refer to a drive as “/dev/rmt/0cbn”, meaning, “drive 0, compressed, berkley blocks, no rewind.”
4. Rewind the tape:
4.1. /usr/bin/mt -f /tmp/tape rew
5. Choose the file from the media report and fast forward to it
5.1. /usr/bin/mt -f /tmp/tape fsf file_number
5.2. If the file is file number 37, you can fsf 37 to reach it. This will skip the Media Header (which is really the first file on the tape)
5.3. Do NOT go to the IDX or TIR files. They are useless to you.
5.4. (Edited 22 October 2002)Please note that we at WPG set Netbackup to break the backups into files that are less than or equal to 2000 kilobytes in length. A backup may, therefore span several files. Locate the Backup id and Fragment number for clues to locating a complete backup. You MUST use the multi-volume option of tar to extract a backup spanning several files.
6. Move ahead one record (to skip the Backup Header)
6.1. /usr/bin/mt -f /tmp/tape fsr 1
7. Run Netbackup’s tar to list or extract!
7.1. To just list the contents, run with the -t option
7.1.1. /usr/openv/netbackup/bin/tar -t -v -f /tmp/tape -b 512
7.2. To extract the entire contents, without a leading /, use -x
7.2.1. /usr/openv/netbackup/bin/tar -x -v -p -f /tmp/tape -b 512
7.3. To extract a specific directory, without a leading /, specify the target directory (NOTE: you can use gnu’s tar instead of Veritas Netbackup’s tar; it will work fine):
7.3.1. /usr/openv/netbackup/bin/tar -x -v -p -f /tmp/tape -b 512 DIRECTORY_NAME
7.4. To extract entire contents from multiple fragments, without leading /, use -M (gnu tar won’t do this)
7.4.1. /usr/openv/netbackup/bin/tar -x -M -v -p -f /tmp/tape -b 512
7.4.2. Tar will automatically position the tape to the next file, assuming it to be the next volume (or fragment) of the backup. It will prompt you to “Prepare volume #X and hit return:”. Just hitting return will continue. If the next fragment is on another tape, then you must rewind the current tape, unmount it, replace with the right tape, fast forward, and fsr to the right file to continue the restore.
7.5. Note that the block size is 256000, so you can pass 512 to tar (actually, it’s really 500, but tar figures it out to be 500 anyway)
7.6. When you are doing multiple restores, note that you may have to rewind the tape (/usr/bin/mt -f /tmp/tape rew) and fast forward (/usr/bin/mt -f /tmp/tape fsf #) to get to the next backup. The device is a “No Rewind” device, so that consecutive backups can be accessed by just moving ahead one record (/usr/bin/mt -f /tmp/tape fsr 1) and re-running tar. (Be mindful of multiple-volume backups when searching for the right backup!)
7.7. Netbackup’s tar’s help can be accessed for additional options (such as NOT stripping the leading /):
7.7.1. /usr/openv/netbackup/bin/tar +help
8. Rewind and Eject the media
8.1. /usr/bin/mt -f /tmp/tape rew
8.2. /usr/openv/volmgr/bin/tpunmount
9. Example:
9.1. I need to restore all of sybprod:/opt2 from an incremental backup done in the early morning of 13 October 2001 (Author’s Note: Damn how nearly prophetic was I! Off by merely one month!). A look on the Images on Media report (that was printed for the duplicates done later that morning) tells me that an incremental backup of Sybprod is on tape 190022. It has a title of “sybprod_0973059916” and shows that it consists of an IDX file and 5 fragments. A look on the Media Contents report tells me that fragment 1 of “sybprod_0973059916” is file number 113 and that the other fragments follow consecutively.
9.2. I find my Unix machine with an AIT drive and install the OS. I also mount the Netbackup Server CD and install the software but don’t configure anything. I discover that the AIT drive is configured as /dev/rmt/0cb (or /dev/rmt/0n for no rewind).
9.3. I put in tape 190022 into the AIT drive. I rewind the tape for good measure.
9.3.1. /usr/bin/mt -f /dev/rmt/0cb rew
9.4. I fast forward 113 files on the tape
9.4.1. /usr/bin/mt -f /dev/rmt/0cbn fsf 113
9.5. I move over the Backup Header
9.5.1. /usr/bin/mt -f /dev/rmt/0cbn fsr 1
9.6. I change to the root directory and make sure that /opt2 exists and has lots of space.
9.6.1. cd / ; ls -ld opt2 ; df -k /opt2
9.7. I begin the restore (note that I’m using a blocking factor of 500, which produces the same result as 512)
9.7.1. /usr/openv/netbackup/bin/tar -x -M -v -p -f \ /dev/rmt/0cbn -b 500 /opt2
9.7.2. I am prompted 4 different times to hit return and dutifully do so.
9.8. I check everything out to make sure it is ok and celebrate, for I am the hero of the day!
NetBackup Encryption Option :-
The NetBackup Encryption Option is located on the “UNIX Options” media (UNIX) and is automatically included in the NetBackup installation (Windows). A valid license key is required to enable functionality.
To place the encryption agent on a client:
/ # bpinst -ENCRYPTION <client>
To confirm installation as well as version installed:
/ # cat /usr/openv/share/version_crypt
NetBackup-CRYPT-Solaris8 6.0MP5
In Windows, this file can be found at C:\Program Files\VERITAS\NetBackup\share\version_crypt.
Encryption will need to be enabled on the client through its Host Properties (Host Properties > Clients > Encryption)
Check the Enable Encryption checkbox to enable encryption. A 128-bit or 256-bit key can be selected from the Client Cipher dropdown menu as well.
A key file will now need to be created on the client. From the command line:
/ # bpkeyutil -clients <client>
Enter new NetBackup pass phrase: ********************
Re-enter new NetBackup pass phrase: ********************
/ # ls -l /usr/openv/var/keyfile.dat
-rw——- 1 root other 136 Jan 14 08:41 /usr/openv/var/keyfile.dat
For this discussion, an encrypted policy will be created to back up a single file. That file will be a simple text file.
/ # echo “Here is our test file. It is unencrypted text.” > /tmp/testfile
/ # ls -l /tmp/testfile
-rw-r–r– 1 root other 48 Jan 14 08:36 /tmp/testfile
/ # cat /tmp/testfile
Here is our test file. It is unencrypted text.
- To enable encryption in the policy, check the “Encryption” checkbox:
- The backup selection list contains the path to the test file:
- For this discussion, an additional policy will be created to back up the key file as well:
- Note that this policy should NOT be encrypted. If the key is lost, it would be impossible to restore if the restore first required a key – itself – before it could complete!
- bppllist output provides a closer examination of these two policies as seen in the above figures. Note the encryption setting in the policy listing as denoted by the Client Encrypt setting:
A similar command line version would be:
/ # bpbackup -p <policy> -s <schedule> -i -S <master> -t <type>
The image has been written. What is in it? First, change directory to the DSU:
/ # cd /opt/encrypted_backups
Find the files that make up the just-written image:
/opt/encrypted_backups # ls -l
total 66898
…
-rw——- 1 root root 32768 Jan 14 08:46 <client>_1200321967_C1_F1.1200321967.img
-rw——- 1 root root 896 Jan 14 08:46 <client>_1200321967_C1_F1.1200321967.info
-rw——- 1 root root 1024 Jan 14 08:46 <client>_1200321967_C1_HDR.1200321967.img
-rw——- 1 root root 898 Jan 14 08:46 <client>_1200321967_C1_HDR.1200321967.info
tar can be used to examine the contents of the image:
/opt/encrypted_backups # tar -tf <client>_1200321967_C1_F1.1200321967.img
10742623350 10741770322 //
10742672662 10742672662 //tmp/
10742672663 10742672663 /.EnCrYpTiOn_CiPhEr.0
10742671626 10742671610 //tmp/testfile
Note the presence of the cipher file. One of the most frequently asked questions is “How can one tell whether a backup is encrypted or not?” In an encrypted backup, every file will have a corresponding cipher. Here is another example from an encrypted backup from a different policy:
/opt/encrypted_backups # tar -tf <client>_1199915090_C1_F1.1199915090.img
10741237766 10726067164 //
10741240125 10741240125 //tmp/
10741240126 10741240126 /.EnCrYpTiOn_CiPhEr.0
10740472477 10740472477 //tmp/.dcs.<client>:0.dcgtlock
10741240126 10741240126 /.EnCrYpTiOn_CiPhEr.1
10740472477 10741237763 //tmp/.dcs.<client>:0.37dd79
10741240126 10741240126 /.EnCrYpTiOn_CiPhEr.2
10740472477 10740472477 //tmp/.dcs.<client>:0.utillock
10741240126 10741240126 /.EnCrYpTiOn_CiPhEr.3
…
The file list continues on, alternating cipher files with actual files.
The ciphers are unreadable data – attempting to extract and cat them produces unreadable results:
/tmp # cat .EnCrYpTiOn_CiPhEr.0
°þ#Kä}Ð
&Äh5ØQ”· xØy¯T3C3?©ø¹
1. To simulate a disaster recovery (DR) scenario, the test file is deleted:
/opt/encrypted_backups # rm /tmp/testfile
rm: remove /tmp/testfile (yes/no)? yes
/opt/encrypted_backups # cd /
First, a restore of the file is attempted without the use of the NetBackup framework (including the encryption agent). A tar is performed on the backup image in an attempt to extract the test file:
/ # /usr/openv/netbackup/bin/tar -xvf /opt/encrypted_backups/<client>_1200321967_C1_F1.1200321967.img
Blocksize = 64 records
/
Removing leading / from absolute path names in the archive.
/tmp/
/tmp/testfile
However, because the file was encrypted, it was restored as encrypted data. It is unreadable:
/ # cd /tmp
/tmp # cat testfile
›`<?QŒÝîJªK
ì-Qp´ê a¢ÄéùJZi-•ã|$¯r«lP;DW
It is necessary to perform the restore from NetBackup, where the key file can be used to decrypt the file.
The restore succeeds, and now the file can be read:
/tmp # cat testfile
Here is our test file. It is unencrypted text.
$$$$$$$$$$$$$$$$$$$$$$$$$$$$$$$$$$$$$$$$$$
How to use the UNIX “dd” command to confirm a corrupt NetBackup media header:
Issue
How to use the UNIX “dd” command to confirm a corrupt NetBackup media header
Error
cannot read media header, may not be NetBackup media or is corrupted
Solution
The very first time a NetBackup tape is used (for either a normal backup or a catalog backup), a “media header” is written to the tape. This media header allows the NetBackup software to verify the tape’s identity for future operations.
In rare circumstances, it is possible for this media header to get overwritten or become corrupt. A NetBackup tape with a corrupt header cannot be imported, although there is a tiny chance of extracting data from such a tape using the tar utility.
The UNIX dd command is a useful tool to examine and therefore confirm an overwritten or corrupt media header. Below are examples of using dd to extract a media header from a tape. (Note that there are two different media header formats used by NetBackup, one for normal backup media and one for catalog backup media)
In the examples below:
the tape NBUDB0 has been used for a NetBackup catalog backup of the NetBackup master server named “NBmaster”
the tape ABC123 has been used for a normal NetBackup backup
· ·
Examining the media header of a NetBackup catalog tape:
The NBU catalog media header is written in ASCII format, which means it is possible to simply ‘cat’ the header contents.
root@NBmaster# /usr/openv/volmgr/bin/tpreq -ev NBUDB0 -d 8mm -p NetBackup /tmp/tape
root@NBmaster#
root@NBmaster# mt -f /tmp/tape status
Exabyte EXB-8505 8mm Helical Scan tape drive:
sense key(0x0)= No Additional Sense residual= 0 retries= 0
file no= 0 block no= 0
root@NBmaster#
root@NBmaster# dd if=/tmp/tape of=/tmp/db-header bs=1024 count=1
1+0 records in
1+0 records out
root@NBmaster#
root@NBmaster# /usr/openv/volmgr/bin/tpunmount /tmp/tape
root@NBmaster#
root@NBmaster# more /tmp/db-header
VERSION 1 UNCOMPRESSED
NBmaster
NBUDB0
02/26/02 01:07:11
32768
3
IMAGE1 = NBmaster:/usr/openv/netbackup/db
IMAGE2 = NBmaster:/usr/openv/volmgr/database
IMAGE3 = NBmaster:/usr/openv/var
Examining the media header of a normal NetBackup backup tape:
The NBU media header is written in binary format, which means the “od” command is necessary to read the header contents.
root@NBmaster# /usr/openv/volmgr/bin/tpreq -ev ABC123 -d 8mm -p Test_Pool /tmp/tape
root@NBmaster#
root@NBmaster# mt -f /tmp/tape status
Exabyte EXB-8505 8mm Helical Scan tape drive:
sense key(0x0)= No Additional Sense residual= 0 retries= 0
file no= 0 block no= 0
root@NBmaster#
root@NBmaster# dd if=/tmp/tape of=/tmp/nbu-header bs=1024 count=1
1+0 records in
1+0 records out
root@NBmaster#
root@NBmaster# /usr/openv/volmgr/bin/tpunmount /tmp/tape
root@NBmaster# cat /tmp/nbu-header | od -c
0000000 V O L 1 A B C 1 2 3
0000020 001 \r < t 017 325
0000040
0000060 013
0000100 004
0000120
*
0000160 T h I s I s A B P t A p
0000200 E h E a D e r
0000220
*
0002000
0002000
$$$$$$$$$$$$$$$$$$$$$$$$$$$$$$$$$$$$$$$$$$
What does NBDB Contains/Do:
NBDB contains the NetBackup Authorization database, the Enterprise Media Manager (EMM) data, as well as other NetBackup data that NetBackup services use.
$$$$$$$$$$$$$$$$$$$$$$$$$$$$$$$$$$$$$$$$$$
Catalog Layout:
Issue
This document presents some suggestions on how the various database and log file components can be relocated to separate file systems to reduce I/O contention and improve performance. The layouts presented in this document offer the best combinations for most environments. However it is possible that for some environments different arrangements of the various files might perform better.
By default the NetBackup binaries and database files are installed into a common path (/usr/openv on Unix and Linux and <install_path>\veritas on Windows) which is typically a single file system. While this gives acceptable performance for most customer environments it does result in a lot of I/O contention between the database and logging process and can lead to degraded performance, particularly in larger environments where I/O traffic during backup windows is significant.
Solution
Components that may be affected by I/O contention:
The following 5 components should, as far as possible, be located on different disks to minimize contention (for the purposes of this document the word ‘disk’ means a file system configured on the storage to avoid I/O contention with other file systems):
1. The unified logs
2. The catalog flat file components (in particular the image database)
3. The catalog relational database data files
4. The catalog relational database index files
5. The catalog relational database transaction logs
As a general rule the databases and log files should be located on RAID 5 or RAID 10 storage to achieve the best mix of performance and resilience.
How to arrange things based on the number of disks available:
Here are some examples of how to arrange your files depending on the number of disks you have available. These examples assume NetBackup has been installed into a single path on disk 1 and identify which components to move to which alternate disk:
· 2 disks – place the catalog flat file components, relational database index files and relational database transaction logs on disk 2, leave all other components on disk 1
· 3 disks – place the catalog flat file components, relational database index files and relational database transaction logs on disk 2, place the relational database data files on disk 3, leave all other components on disk 1
· 4 disks – place the catalog flat file components on disk 2, place the relational database data files on disk 3, place the relational database index files and relational database transaction logs on disk 4, leave all other components on disk 1
· 5 disks – place the catalog flat file components on disk 2, place the relational database data files on disk 3, place relational database index files and relational database transaction logs on disk 4, place the unified logs on disk 5, leave all other components on disk 1
· 6 disks – place the catalog flat file components on disk 2, place the relational database data files on disk 3, place the relational database index files on disk 4, place the unified logs on disk 5, place the relational database transaction logs on disk 6, leave all other components on disk 1
Relocating the flat file database:
The flat file database resides under /usr/openv/netbackup/db on Unix and Linux and <install_path>\veritas\netbackup\db on Windows.
There are no commands that allow the databases to be located but for Unix, Linux and Windows 2008 it is possible to use soft links (created using the mklink command on Windows 2008 and ln –s on Unix and Linux) to create links to a separate file system. The catalog backup will follow these links.
The largest and most I/O intensive part of the flat file database is the image database (/usr/openv/netbackup/db/images on Unix and Linux and <install_path>\veritas\netbackup\db\images on Windows) and you can also link at this level to just relocate the image database.
For Windows 2003 there is no link command but the image database can still be relocated to a separate file systems by using ALTPATH entries at the client level (i.e. each client directory, <install_path>\veritas\netbackup\db\images\<client_name> must contain a file called ALTPATH which includes the path to the corresponding client directory on the alternative disk. Details of how to move catalog image trees and use the ALTPATH feature can be found in the section headed “Moving the image catalog” in Volume 1 of the NetBackup System Administrators Guide for Windows.
Relocating relational database components:
Use the nbdb_move command to relocate the different components of the relational databases, the –data qualifier determines the location of the data files, the –index qualifier determines the location of the index files and the –tlog qualifier determines the location of the transaction logs.
Example:
/usr/openv/db/bin/nbdb_move -data /netbackupdb/data -index /netbackupdb/index –tlog /netbackupdb/db/logs
In this example there may be a single disk/mount point of /netbackupdb or separate mount points for each component.
Relocating log files:
The default location for the log files is /usr/openv/netbackup/logs on Unix and Linux and <install_path>\veritas\netbackup\logs on Windows.
If unified logging is used the log files can be relocated using the vxlogcfg command to specify the new path to the log files.
For Unix and linux the syntax is:
/usr/openv/netbackup/bin/vxlogcfg -a -p NB -o Default -s LogDirectory=new_log_path
For Windows the syntax is:
<install_path>\NetBackup\bin\vxlogcfg -a -p NB -o Default –s LogDirectory=new_log_path
If unified logging is not used the path can be soft linked to another disk.
Relocating the relational database staging area:
One final piece of the catalog that can be optional relocated is the staging area used to hold the temporary relational database files created. By default this area is /usr/openv/db/tmp on Unix and Linux machines and <install_path>\veritas\netbackupdb\staging on Windows machines. Relocating the staging area to a different disk can improve performance during backup and restore. The following command can be used to relocate the staging area.
nbdb_admin -vxdbms_nb_staging new_staging_area
Best practice for NetBackup catalog layout
$$$$$$$$$$$$$$$$$$$$$$$$$$$$$$$$$$$$$$$$$$
How to calculate the size of the NetBackup relational database (NBDB)
By default, the NBDB database resides on the NetBackup master server. Other configurations are possible.
Note:
This space must be included when determining size requirements for a master server or media server, depending on where the NBDB database is installed.
The NBDB database is part of the NetBackup catalog. More information is available on the components of the catalog.
See About the NetBackup catalog.
Space for the NBDB database is required in the following two locations:
UNIX
/usr/openv/db/data
/usr/openv/db/staging
Windows
install_path\NetBackupDB\data
install_path\NetBackupDB\staging
To calculate the required space for the NBDB in each of the two directories, use this formula
160 MB + (2 KB * number of volumes that are configured for EMM) + (number of images in disk storage other than BasicDisk * 5 KB) + (number of disk volumes * number of media severs * 5 KB)
where EMM is the Enterprise Media Manager, and volumes are NetBackup (EMM) media volumes. Note that 160 MB is the default amount of space that is needed for the NBDB database. It includes pre-allocated space for configuration information for devices and storage units.
Note:
During NetBackup installation, the install script looks for 160 MB of free space in the /data directory. If the directory has insufficient space, the installation fails. The space in /staging is only required when a catalog backup runs.
The NBDB transaction log occupies a portion of the space in the /data directory that NBDB requires. This transaction log is only truncated (not removed) when a catalog backup is performed. The log continues to grow indefinitely if a catalog backup is not made at regular intervals.
The following is an example of how to calculate the space needed for the NBDB database.
Assuming there are 1000 EMM volumes to back up, the total space that is needed for the NBDB database in /usr/openv/db/data is:
160 MB + (2 KB * 1000 volumes) + (5 KB * 1000 AdvancedDisk images) + (5 KB * 10 AdvancedDisk volumes * 4 media servers) = 167.2 MB
The same amount of space is required in /usr/openv/db/staging. The amount of space that is required may grow over time as the NBDB database increases in size.
Note:
The 160 MB of space is pre-allocated.
Additional details are available on the files and database information that are included in the NBDB database. See the NetBackup Administrator’s Guide.
$$$$$$$$$$$$$$$$$$$$$$$$$$$$$$$$$$$$$$$$$
How to calculate the size of your NetBackup image database
An important factor when designing your backup system is to calculate how much disk space is needed to store your NetBackup image database. Your image database keeps track of all the files that have been backed up.
The image database size depends on the following variables, for both full and incremental backups:
The number of files being backed up
The frequency and the retention period of the backups
You can use either of two methods to calculate the size of the NetBackup image database. In both cases, since data volumes grow over time, you should factor in expected growth when calculating total disk space used.
NetBackup automatically compresses the image database to reduce the amount of disk space required. When a restore is requested, NetBackup automatically decompresses the image database, only for the time period needed to accomplish the restore. You can also use archiving to reduce the space requirements for the image database. More information is available on catalog compression and archiving.
See the NetBackup Administrator’s Guide, Volume I.
Note:
If you select NetBackup’s True Image Restore option, your image database becomes larger than an image database without this option selected. True Image Restore collects the information that is required to restore directories to their contents at the time of any selected full or incremental backup. The additional information that NetBackup collects for incremental backups is the same as the information that is collected for full backups. As a result, incremental backups take much more disk space when you collect True Image Restore information.
First method: You can use this method to calculate image database size precisely. It requires certain details: the number of files that are held online and the number of backups (full and incremental) that are retained at any time.
To calculate the size in gigabytes for a particular backup, use the following formula:
image database size = (132 * number of files in all backups)/ 1GB
To use this method, you must determine the approximate number of copies of each file that is held in backups and the typical file size. The number of copies can usually be estimated as follows:
Number of copies of each file that is held in backups = number of full backups + 10% of the number of incremental backups held
The following is an example of how to calculate the size of your NetBackup image database with the first method.
This example makes the following assumptions:
Number of full backups per month: 4
Retention period for full backups: 6 months
Total number of full backups retained: 24
Number of incremental backups per month: 25
Total number of files that are held online (total number of files in a full backup): 17,500,000
Solution:
Number of copies of each file retained:
24 + (25 * 10%) = 26.5
NetBackup image database size for each file retained:
(132 * 26.5 copies) = 3498 bytes
Total image database space required:
(3498 * 17,500,000 files) /1 GB = 61.2 GB
Second method: Multiply by a small percentage (such as 2%) the total amount of data in the production environment (not the total size of all backups). Note that 2% is an example; this section helps you calculate a percentage that is appropriate for your environment.
Note:
You can calculate image database size by means of a small percentage only for environments in which it is easy to determine the following: the typical file size, typical retention policies, and typical incremental change rates. In some cases, the image database size that is obtained using this method may vary significantly from the eventual size.
To use this method, you must determine the approximate number of copies of each file that are held in backups and the typical file size. The number of copies can usually be estimated as follows:
Number of copies of each file that is held in backups = number of full backups + 10% of the number of incremental backups held
The multiplying percentage can be calculated as follows:
Multiplying percentage = (132 * number of files that are held in backups / average file size) * 100%
Then, the size of the image database can be estimated as:
Size of the image database = total disk space used * multiplying percentage
The following is an example of how to calculate the size of your NetBackup image database with the second method.
This example makes the following assumptions:
Number of full backups per month: 4
Retention period for full backups: 6 months
Total number of full backups retained: 24
Number of incremental backups per month: 25
Average file size: 70 KB
Total disk space that is used on all servers in the domain: 1.4 TB
Solution:
Number of copies of each file retained:
24 + (25 * 10%) = 26.5
NetBackup image database size for each file retained:
(132 * 26.5 copies) = 3498 bytes
Multiplying percentage:
(3498/70000) * 100% = 5%
Total image database space required:
(1,400 GB * 4.5%) = 63 GB
$$$$$$$$$$$$$$$$$$$$$$$$$$$$$
Example Operating System Tuning Values for Linux Master server running 7.x
Issue
Netbackup is designed to work with the default Linux operating system settings. For large environments, better performance can be found by tuning the operating system settings. The example values provided in this TechNote are for informational purposes and should be used as a reference tool only.
Every NetBackup environment is different. To get the most performance out of a NetBackup Master, Symantec recommends contacting Symantec Consulting Services to assist with an onsite health check and tuning changes as required.
Solution
Example Tuning Settings for a Master server handling >100 SAN Media servers and >1000 tape devices:
1 – Make changes to /proc/sys/kernel
- This setting is dynamic and no reboot is required.
- This is good for testing settings but will not persist after reboot
echo 256 > /proc/sys/kernel/msgmni
echo 8192 > /proc/sys/kernel/msgmax
echo 65536 > /proc/sys/kernel/msgmnb
echo 300 32000 64 1024 > /proc/sys/kernel/sem
echo “1” > /proc/sys/kernel/core_uses_pid
echo “/var/log/core.%e.%p” > /proc/sys/kernel/core_pattern
2 – /etc/sysctl.conf
- Changing settings here makes them persistent
kernel.sem = 300 307200 32 1024
kernel.msgmni = 256
kernel.shmmni = 4096
kernel.core_pattern = /var/log/core.%e.%p
Check settings with:
>egrep “kernel.sem|kernel.msg|kernel.shm|core_p|core_u” /etc/sysctl.conf
kernel.sem = 300 307200 32 1024
kernel.msgmnb = 65536
kernel.msgmni = 256
kernel.msgmax = 65536
kernel.shmmni = 4096
kernel.shmall = 4294967296
kernel.shmmax = 68719476736
kernel.core_pattern = /var/log/core.%e.%p
kernel.core_uses_pid = 1
3 – /etc/security/limits.conf
add lines:
- soft core unlimited
- hard core unlimited
- soft nofile 8192
- hard nofile 63535
NOTE:
Making changes to /etc/security/limits.conf file does not change the ulimit values for the currently running NetBackup daemons if they were started by the init scripts in /etc/init.d. The ulimit changes will take affect once NetBackup daemons are restarted from the root shell.
4- /etc/pam.d/login
add line:
session required /lib/security/pam_limits.so
5 – /etc/profile
add line:
ulimit -S -c unlimited > /dev/null 2>&1 ulimit -aH
Confirm settings after login with:
>ulimit -aH
core file size (blocks, -c) unlimited
data seg size (kbytes, -d) unlimited
max nice (-e) 0
file size (blocks, -f) unlimited
pending signals (-i) 137215
max locked memory (kbytes, -l) 32
max memory size (kbytes, -m) unlimited
open files (-n) 63535
pipe size (512 bytes, -p) 8
POSIX message queues (bytes, -q) 819200
max rt priority (-r) 0
stack size (kbytes, -s) unlimited
cpu time (seconds, -t) unlimited
max user processes (-u) 137215
virtual memory (kbytes, -v) unlimited
file locks (-x) unlimited
See Also: 3rd party guide to tuning 10Gb network cards on Linux
Tuning 10Gb network cards on Linux
http://www.kernel.org/doc/ols/2009/ols2009-pages-169-184.pdf
NOTE:
The settings provided in this document are an example of tuning values and are for reference use only. Caution is advised when modifying system and user tuning values as the changes may not be appropriate for your particular system. Always make a backup of any configuration files before making any changes.
$$$$$$$$$$$$$$$$$$$$$$$$$$$$$$
Recommended NetBackup *NIX semaphore tuning values (Linux/Solaris/HP-UX/AIX)
Issue
A Master Server and Media server running NetBackup may need OS level system resources increased to function properly. The following values are used by NetBackup engineering in their test environments. These are recommended minimum values that should address some OS related performance issues. If OS resource limitations are below recommended values NetBackup may not work as effectively as expected. Resource limitations have been known to cause behaviors including application hangs, status code 252, processing delays, and lack of responsiveness amongst other things.
The proposed semaphore values are a recommended minimum. If your environment already exceeds these values, you should not reduce them to the recommended values.
Solution
The following semaphore properties should be adjusted:
SEMMSL – The maximum number of semaphores in a sempahore set.
SEMMNS – A system-wide limit on the number of semaphores in all semaphore sets. The maximum number of sempahores in the system.
SEMOPM – The maximum number of operations in a single semop call
SEMMNI – A system-widerff limit on the maximum number of semaphore identifiers (sempahore sets)
NetBackup support recommends the following values:
SEMMSL SEMMNS SEMOPM SEMMNI
300 307200 32 1024
Validating/Changing Linux semaphore values:
Run the following command to check existing semaphore values:
root@NBU-Master:~ > sysctl -a | grep kernel.sem
kernel.sem = 250 256000 32 1024
These values can be adjusted immediately without a restart using the following (but will not persist over a reboot):
root@NBU-Master:~ > cat /proc/sys/kernel/sem
250 256000 32 1024
root@NBU-Master:~ > echo 300 307200 32 1024 > /proc/sys/kernel/sem
root@NBU-Master:~ > sysctl -a | grep kernel.sem
kernel.sem = 300 307200 32 1024
To modify system semaphore values permanently, running the following will change their default setting and apply these new values immediately:
root@NBU-Master:~ > echo “kernel.sem=300 307200 32 1024”>> /etc/sysctl.conf
root@NBU-Master:~ > cat /etc/sysctl.conf | grep kernel.sem
kernel.sem = 300 307200 32 1024
root@NBU-Master:~ > sysctl -p
After running these commands, even after a reboot, the server will maintain the semaphore values that have been set. Changing semaphore values has resolved multiple performance issues observed on NetBackup Master or Media Servers.
Validating/Changing Solaris semaphore values:
Solaris 10 uses projects to set these values. The following steps check for the existence of a NetBackup project, and allow you to tune semaphore values within the project. It is not required to run NetBackup in a project on these operating systems but the following steps are what is required to set semaphore values on a Solaris 10 system:
First check to see if a NetBackup project already exists on the server:
12:17:00^root@NBSolMaster:~ > projects -l NetBackup
projects: project “NetBackup” does not exist
If no NetBackup project has been configured on your system, please reviewhttp://www.symantec.com/docs/TECH62633 for a detailed explanation of the steps required to setup a NetBackup project on Solaris.
After a project has been added for NetBackup, you will see the following output:
12:30:15^root@NBSolMaster:~ > projects -l NetBackup
NetBackup
projid : 1000
comment: “NetBackup resource project”
users : root
groups : (none)
attribs:
Once a project has been designed attributes can be set to address semaphore usage as follows:
12:30:15^root@NBSolMaster:~ > projmod -a -K ‘project.max-sem-nsems=(privileged,300,deny)’ NetBackup
12:30:25^root@NBSolMaster:~ > projmod -a -K ‘project.max-sem-ops=(privileged,32,deny)’ NetBackup
12:30:37^root@NBSolMaster:~ > projmod -a -K ‘project.max-sem-ids=(privileged,1024,deny)’ NetBackup
In Solaris 10+ SEMMNS has been deprecated.
After entering these values, please rerun the following to confirm that they have been set:
12:35:03^root@NBSolMaster:~ > projects -l NetBackup
NetBackup
projid : 1000
comment: “NetBackup resource project”
users : root
groups : (none)
attribs: project.max-sem-ids=(privileged,1024,deny)
project.max-sem-nsems=(privileged,300,deny)
project.max-sem-ops=(privileged,32,deny)
Validating/Changing HP-UX semaphore values:
Run the following command to check existing semaphore values:
- kctune -v semmsl semmns semopm semmni
Increasing the semaphore values that are reported can be done with the following:
- kctune semmsl=300
- kctune semmns=307200
- kctune semopm=32
- kctune semmni=1024
After setting these values using kctune, you may need to reboot the server to update these values. The following command can be used to validate the changes:
- kctune -v semmsl semmns semopm semmni
Validating/Changing AIX semaphore values:
AIX is self tuning and will adjust these values automatically as needed.
$$$$$$$$$$$$$$$$$$$$$$$$$$$$$$$$$$$$$$$$$$$$$$$$$
Creating and Configuring DataDomain Disk Pools into NetBackup
#####commands in DD######
–> to see the license info.. it should have the OST license to use Open storage
license show
–> ad the user to use for OST
user add ost
—> list the user
user show list
—->set the user as DDboost user
ddboost set user-name ost
—> check the DD boost status.
ddboost status
—> if DDboost is disabled enable the DDboost
ddboost enable
–> confirm the DDboost is enabled.
ddboost status
—>Create the STU in DD using the DDboost
ddboost storage-unit create <STUname>
—> list the STU in DD
ddboost storage-unit show
###############################
Once done with the DD setup do the below tasks in in NetBackup
1) check the communication with NetBackup to master and media to DD
2) nbdevconfig -creatests -storage_server [OST-Server] -stype DataDomain -media_server [NBU-Server]
To add the username and password use below
3) tpconfig -add -storage_server [OST-Server] -stype [PLUG-IN] -sts_user_id [OST-USER] -password [OST-USER-PASSWORD]
4)create a OST Storage unit in NetBackup using the Disk pool
5)test backup
###############
Issue
After updating DataDomain plug-in (version 2.5.0.3) and running the tpconfig command to change the password on a NetBackup 7.5.0.4 media server configured for OpenStorage [OST(DD)] storage, all subsequent backups written to the DataDomain storage have failed with the error Disk storage is down (2106) reported.
Error
Error nbjm (pid=4340) NetBackup status 2106, EMM status Storage server is Down or unavailable.
Disk storage is down (2106)
Troubleshooting:
{Checked the OST(DD) configuration on the upgraded Media server}:
Opened a command prompt to ..\NetBackup\bin\admincmd (Note: On UNIX/Linux servers, the path to these commands is /usr/openv/netbackup/bin/admincmd), and ran the following commands:
nbdevquery -liststs -stype DataDomain -U
- Checked the State : DOWN
nbdevquery -listdp -stype DataDomain -U
- Disk_Pool: OST_DD_Pool01 = UP – Storage Server: OST_DD_Storage01 = DOWN
nbdevquery -listdv -stype DataDomain -U
- OST_DD_Storage01 = DOWN | Disk Volume name: ddboost – Flag: InternalDown
bpstsinfo -pi
- Properly displayed the DataDomain Plug-in information
Syntax to change the state of an OST(DD) disk volume:
> nbdevconfig -changestate -stype <server_type> -dp <disk_pool_name> – dv <vol_name> -state <state>
> nbdevconfig -changestate -stype DataDomain -dp OST_DD_Pool01 -dv ddboost -state UP
- Command completed succesfully
nbdevquery -liststs -stype DataDomain -U
- Checked the State: DOWN
nbdevquery -listdp -stype DataDomain -U
- Disk_Pool: OST_DD_Pool01 = UP – Storage Server: OST_DD_Storage01 = DOWN
nbdevquery -listdv -stype DataDomain -U
- OST_DD_Pool01 = DOWN | Disk Volume name: ddboost – Flag: InternalDown
No Changes?
bpstsinfo -si
- Properly displayed the DataDomain storage server information
Opened the NetBackup Administration Console > Credentials > Storage Servers.
- Highlighted Storage Server OST_DD_Storage01 in the top pane
- In the bottom pane BOTH the master and media servers are listed as media servers for the Storage Server
Cause:
Both the media server AND the master server were specified as “media servers” under Credentials > Storage Servers; and the OST(DD) plug-in and the NetBackup Credentials for the Storage Server had only been updated on the media server, but not the master server, and the mis-match in the “plug-in” and the “Storage Server” credentials between the two “media servers” configured for the storage servers cause the OST(DD) Disk Pool and Storage Servers to go to a DOWN state.
Solution
Copied the OST(DD) 2.5.0.3 plug-in installation files to the NetBackup master server, and performed the following actions:
1. Upgrade the OST(DD) plugin on the master to version 2.5.0.3 – to match the version on the media server
Cycle the NetBackup services.
To stop and start the NetBackup services on a Windows master or media server:
Open a command prompt to <Install_path>\NetBackup\bin and run:
bpdown -v -f
Then, start the services:
bpup -v -f
Note: On a UNIX/Linux server these commands would be executed:
- /usr/openv/netbackup/bin/goodies/netbackup stop
- /usr/openv/netbackup/bin/goodies/netbackup start
2. Run the tpconfig -update command to change the OST(DD) credentials for the master server:
Open a command prompts to the <install_path>\volmgr\bin directory (UNIX/Linux: /usr/openv/volmgr/bin directory) and run:
tpconfig -update -storage_server <storage_server_name> -stype DataDomain -sts_user_id <user_name> -password <new_password>
3. Run the following NetBackup command to confirm the password change on the master server allows the master server to access the OST(DD) storage server:
Open a command prompts to <install_path>\netbackup\bin\admincmd (UNIX/Linux server: /usr/openv/netbackup/bin/admincmd):
bpstsinfo -si
Note: The bpstsinfo -si command (run from the master server) should display a similar output to what was displayed when this command was run on the media server.
Wait a few minutes (10 to 20 minutes) before proceeding.
4. Run the following command from the master server to check the current state of the OST(DD) storage servers, disk volumes, and disk pools.
Note: below are the states that should be seen after the above actions have been performed:
nbdevquery -liststs -stype DataDomain -U
- State: UP
nbdevquery -listdp -stype DataDomain -U
- Disk_Pool: OST_DD_Pool01 = UP – Storage Server: OST_DD_Storage01 =UP
nbdevquery -listdv -stype DataDomain -U
- OST_DD_Pool01 = UP | Disk Volume name: ddboost – Flag: InternalUP
$$$$$$$$$$$$$$$$$$$$$$$$$$$$$$$$$$$$$$$$$$$
Decommission of MSDP
How to remove NetBackup Media Server Deduplication option (MSDP) configurations from a NetBackup environment.
NOTE: For NetBackup version 7.0.1, the script in step 13 is only available with the latest dedup bundle from ET2233961 / TECH153190. For version 7.1.0.1, only with the latest dedup bundle from ET2412409. Delivered in 7.1.0.2 and higher and in version 7.5. Please upgrade to obtain this functionality.
All commands are located in the admincmd directory unless otherwise noted:
Unix: /usr/openv/netbackup/bin/admincmd
Windows: <install path>\NetBackup\bin\admincmd
1. Ensure a recent and successful hot catalog backup exists before proceeding. In the next steps we are going to delete Storage Lifecycle Policies (SLPs), Storage Units, and Image references in the Catalog.
2. Make sure no policies point directly or indirectly (through SLP) to the MSDP we are going to decommission. This is to ensure no new backup images will be written to the MSDP while we are removing it in the next steps. Furthermore it will make it possible to remove the SLPs pointing to the MSDP.
3. Make sure that the MSDP doesn’t hold any images still under SLP control. Use nbstlutil to cancel SLP processing for any images that are currently being read from or written to the MSDP being decommissioned.
4. Carefully expire only the images from the catalog that pertain to the Disk Pool to be removed. (NetBackup administration console -> NetBackup Management -> Catalog, ‘Action’ dropdown set to ‘Verify’, change ‘Disk type’ dropdown to PureDisk, and ‘Disk Pool’ dropdown to the MSDP Disk Pool name in question. Then change the start date to a past date/time to accommodate the oldest images, then click ‘Search Now’. Select all the images found, right-click and choose ‘Expire’.)
Wait for the NetBackup ‘Image Cleanup’ jobs to complete before proceeding.
Additional steps may be involved if using Storage Lifecycle Policies:
If, during image expiration, you receive an error :
NetBackup status code: 1573
Message: Backup image cannot be expired because its SLP processing is not yet complete
Do ONE of the following:
Wait until SLP processing for that image is complete, then retry the expiration operation.
Use the nbstlutil -cancel command to cancel further processing on the relevant image: nbstlutil cancel -backupid <BackupID>
Then retry the expiration operation.
Add the -force_not_complete option to the bpexpdate command to force expiration even if the image-copy is not SLP complete:
bpexpdate -stype PureDisk -dp <disk pool> -dv <disk volume> -force_not_complete
Use -notimmediate if there are many images to be deleted. Refer to HOWTO43656.
Continue with the next steps only after completing the previous steps.
5. Delete any SLPs that point to the MSDP.
If you instead choose to remove the MSDP from the SLPs (for example, if you plan to re-add it later), make sure that no SLP versions refer to the MSDP.
This can be verified with the command: nbstl -L -all_versions
Note that if ‘CLEANUP_SESSION_INTERVAL_HOURS’ has not been changed in the LIFECYCLE_PARAMETERS config file, then old SLP versions may exist 14 days (default) after a new SLP version has been created. See TECH172249 and HOWTO68320 for further information.
6. Delete any storage units that belong to the MSDP.
7. Clean up images using nbdelete and bpimage:
nbdelete -allvolumes -force
bpimage -cleanup -allclients
8. Set the Disk Pool to a down state using nbdevconfig (install_path\NetBackup\bin\admincmd):
nbdevconfig -changestate -stype PureDisk -dp your_MSDP_disk_pool_name -dv PureDiskVolume -state DOWN
9. Run this command on the master server to list all server entries: nbemmcmd -listhosts
Take note of the NDMP machinetype entry for the storage server in question.
10. Delete the Disk Pool from the NetBackup Administration Console -> Devices -> Disk Pools
11. Delete the storage server credentials, storage server and the storage server NDMP machine type from the EMM database:
\Volmgr\bin\tpconfig -delete -storage_server your_MSDP_storage_server_name -stype PureDisk -sts_user_id root
nbdevconfig -deletedp -stype PureDisk -dp you_disk_pool_name
nbdevconfig -deletests -storage_server your_MSDP_storage_server_name -stype PureDisk
nbemmcmd -deletehost -machinename your_MSDP_storage_server_name -machinetype ndmp
Note that the tpconfig and nbdevconfig commands above will fail if you deleted the storage server and credentials in the NetBackup Admin Console. This is OK.
12. Stop NetBackup services on the MSDP server.
13. Execute the PDDE_deleteConfig script to remove the MSDP configurations:
Windows: <install_path>\Veritas\pdde\PDDE_deleteConfig.bat
UNIX/Linux: /usr/openv/pdde/pdconfigure/scripts/installers/PDDE_deleteConfig.sh
14. Remove any cfg files referring to the MSDP server under /usr/openv/lib/ost-plugins (Unix) or \NetBackup\bin\ost-plugins (Windows). This must be done on the MSDP server itself and any other servers referencing the host as an ‘Additional Server’.
On the MSDP server being deleted, also remove the cfg files for any other MSDP servers. These will be re-created should one later be re-created on the MSDP host.
15. Delete the deduplication storage directory (and db path, if it was specified at installation time).
- Note: If this is an appliance (52×0), do NOT delete /disk. It is better to do a Factory Reset at this step when on an appliance (HOWTO94245)
16. Start the NetBackup services/processes.
17. Create new Storage Server and Disk Pool
Admin Console –> Storage Servers –> New Storage Server
Admin Console –> Devices –> Disk Pools –> New Disk Pool
$$$$$$$$$$$$$
Trying to delete a disk pool in our environment but its not getting deleted and throwing Error
DSM has found that one or more volumes in the disk pool mps2647_dp_fs_avid(DataDomain)@mps2647 has image fragments failed to delete disk pool, invalid command parameter
For 7.1 try: nbstlutil remove_all -mediaid @aaaba –force
For 7.5 try: nbstlutil remove_exp -force
Example:
E:\VERITAS\NetBackup\bin\admincmd>nbstlutil remove_all -mediaid @aaaaj
This operation will remove all image, copy, and fragment entries in the database and may seriously impact ongoing operation of the system. Do you wish to proceed? (y/n) >y
E:\VERITAS\NetBackup\bin\admincmd>
$$$$$$$$$$$$$$$$$$$$$$$$$$
RAC configuration – Oracle – NetBackup
Example RAC configuration: Failover VIP is not available, and backup is load balanced, one policy with custom script
Example RAC configuration: Failover VIP is not available, and backup is load balanced, one policy with custom script
A load-balanced backup without a failover vipname must overcome the combined challenges of the preceding configurations. Because a failover vipname does not exist, the NetBackup scheduler must attempt to execute the backup script on both hosts and the script must start RMAN on only one of the hosts. Because RMAN may allocate channels on both instances, the user-directed requests must present host specific names so that the connect-back from the NetBackup media server is able to retrieve the data from the correct host.
The policy should specify both client names, either hostname1 and hostname2 or vipname1 and vipname2, to ensure that the backup script is executed on a host which is currently operational.
The backup script must be accessible to both hosts in the cluster. The clustered file system makes a good location.
The backup script should be customized so that it starts RMAN on exactly one of the clients. If executed on the primary, then start RMAN and perform the backup. If executed on the secondary and the primary is up, then exit with status 0 so that the NetBackup scheduler does not retry this client. If executed on the secondary and the primary is down, then start RMAN and perform the backup. The script customization could be built around a tnsping to the primary or even a query of the database to see if the other instance is open and able to perform the backup, e.g.
$ select INST_ID,STATUS,STARTUP_TIME, HOST_NAME from gv$instance;
INST_ID STATUS STARTUP_T HOST_NAM
———- ———— ——— ———
1 OPEN 13-JAN-09 vipname1
2 OPEN 13-JAN-09 vipname2
The backup script must not be configured to send a single value for NB_ORA_CLIENT because the NetBackup media server needs to connect back to the correct host depending on which host originated the user-directed backup request.
Configure the backup to provide a host specific client name with each backup request using one of the following three options:
Configure RMAN to bind specific channels to specific instances and send specific client names on each channel for backup image storage and for connect-back to the requesting host for the data transfer. Do not use the failover VIP name, because it is active on only one of the hosts.
ALLOCATE CHANNEL 1 … PARMS=’ENV=(NB_ORA_CLIENT=vipname1)’ CONNECT=’sys/passwd@vipname1′;
ALLOCATE CHANNEL 2 … PARMS=’ENV=(NB_ORA_CLIENT=vipname2)’ CONNECT=’sys/passwd@vipname2′;
ALLOCATE CHANNEL 3 … PARMS=’ENV=(NB_ORA_CLIENT=vipname1)’ CONNECT=’sys/passwd@vipname1′;
ALLOCATE CHANNEL 4 … PARMS=’ENV=(NB_ORA_CLIENT=vipname2)’ CONNECT=’sys/passwd@vipname2′;
Note:
If one or more of these nodes are down, these allocation operations fail which causes the backup to fail.
Alternatively, configure Oracle to bind specific channels to specific hosts.
CONFIGURE CHANNEL 1 DEVICE TYPE ‘SBT_TAPE’ CONNECT ‘sys/passwd@vipname1’ PARMS
“ENV=(NB_ORA_CLIENT=vipname1)”;
CONFIGURE CHANNEL 2 DEVICE TYPE ‘SBT_TAPE’ CONNECT ‘sys/passwd@vipname2’ PARMS
“ENV=(NB_ORA_CLIENT=vipname2)”;
CONFIGURE CHANNEL 3 DEVICE TYPE ‘SBT_TAPE’ CONNECT ‘sys/passwd@vipname1’ PARMS
“ENV=(NB_ORA_CLIENT=vipname1)”;
CONFIGURE CHANNEL 4 DEVICE TYPE ‘SBT_TAPE’ CONNECT ‘sys/passwd@vipname2’ PARMS
“ENV=(NB_ORA_CLIENT=vipname2)”;
By default, the backup uses CLIENT_NAME from the bp.conf file which should be distinct for each host and is typically the physical hostname.
Configure the NetBackup master server to allow the physical host names access to all of the backup images.
cd /usr/opnv/netbackup/db/altnames
echo “hostname1” >> hostname1
echo “vipname1” >> hostname1
echo “hostname2” >> hostname1
echo “vipname2” >> hostname1
cp hostname1 hostname2
If REQUIRED_INTERFACE or another means is used on the client hosts to force NetBackup to use the IP addresses associated with the vip names for the outbound user-directed backup requests, then the NetBackup master configuration must be extended in the reverse direction.
cd /usr/openv/netbackup/db/altnames
cp hostname1 vipname1
cp hostname1 vipname2
The net result is that the backup script runs on all of the currently active hosts but only starts RMAN on one host. RMAN allocates channels across the hosts for load balancing. The user-directed backup requests include a NB_ORA_CLIENT or CLIENT_NAME specific to the requesting host and which matches the policy. The connect-back for data transfer and the backup image are stored under that name.
Either client can initiate a restore and RMAN can be configured with ‘SET AUTOLOCATE ON;’ to request the backupset pieces from the appropriate instance/host that performed the backup. Alternatively, restores can take place from either host or instance as long as the restore request is configured to specify the same client name as used at the time of the backup.
SEND ‘NB_ORA_CLIENT=client_name_used_by_backup’;
$$$$$$$$$$$$$$$$$$$$$$$$$$$$$$$$$$
Example RAC configuration: Failover VIP exists and backup is load balanced
Example RAC configuration: Failover VIP exists and backup is load balanced
In this configuration, the NetBackup master server can always use the failover vipname to reach an active host to run the backup script. However, because RMAN allocates the channels on both hosts, the NetBackup media server must connect back to the correct host to obtain the data for each request. Hence, the backup images are stored under two different client names which also differ from the failover vipname that is used to execute the script.
Set up the policy to specify the failover vipname as the client name. Thus, the Automatic schedule executes the backup script on a host that is currently operational.
The backup script or an identical copy must be accessible to all hosts in the cluster. The clustered file system is a good location.
Do not configure the backup script to send a single value for NB_ORA_CLIENT. The NetBackup media server must connect back to the correct host, which depends on which host originated the user-directed backup request. Select one of the following three methods to accomplish this task:
Configure the backup to provide a host-specific client name with each backup request using one of the following three options:
Configure RMAN to bind specific channels to specific instances and send specific client names on each channel for backup image storage and for connect-back to the requesting host for the data transfer. Do not use the failover VIP name, because it is active on only one of the hosts.
ALLOCATE CHANNEL 1 … PARMS=’ENV=(NB_ORA_CLIENT=vipname1)’ CONNECT=’sys/passwd@vipname1′;
ALLOCATE CHANNEL 2 … PARMS=’ENV=(NB_ORA_CLIENT=vipname2)’ CONNECT=’sys/passwd@vipname2′;
ALLOCATE CHANNEL 3 … PARMS=’ENV=(NB_ORA_CLIENT=vipname1)’ CONNECT=’sys/passwd@vipname1′;
ALLOCATE CHANNEL 4 … PARMS=’ENV=(NB_ORA_CLIENT=vipname2)’ CONNECT=’sys/passwd@vipname2′;
Note:
If one or more of these nodes are down, these allocation operations fail which causes the backup to fail.
Alternatively, configure Oracle to bind specific channels to specific hosts.
CONFIGURE CHANNEL 1 DEVICE TYPE ‘SBT_TAPE’ CONNECT ‘sys/passwd@vipname1’ PARMS
“ENV=(NB_ORA_CLIENT=vipname1)”;
CONFIGURE CHANNEL 2 DEVICE TYPE ‘SBT_TAPE’ CONNECT ‘sys/passwd@vipname2’ PARMS
“ENV=(NB_ORA_CLIENT=vipname2)”;
CONFIGURE CHANNEL 3 DEVICE TYPE ‘SBT_TAPE’ CONNECT ‘sys/passwd@vipname1’ PARMS
“ENV=(NB_ORA_CLIENT=vipname1)”;
CONFIGURE CHANNEL 4 DEVICE TYPE ‘SBT_TAPE’ CONNECT ‘sys/passwd@vipname2′ PARMS
“ENV=(NB_ORA_CLIENT=vipname2)”;
By default, the backup uses CLIENT_NAME from the bp.conf file which should be distinct for each host and is typically the physical host name.
Because CLIENT_NAME or NB_ORA_CLIENT values must differ from the failover vipname in the policy, the NetBackup master server cannot accept the user-directed backup request unless it implements one of the following options.
Option A: Modify the existing policy and the backup script to handle multiple client names.
Add both vipnames to the policy, in addition to the failover vipname .
Modify the script so that it exits with status 0 if the client name is not the failover vipname .
Option B: Alternatively, use a separate policy to accept the backup requests.
Create a second policy to receive the backup requests from RMAN.
Set the policy type to be Oracle.
Set the policy to contain the VIP, client, or host names as configured for NB_ORA_CLIENT or CLIENT_NAME in the previous step.
The Application Backup schedule must have an open window to accept the backups.
The policy does not need a backup script or an automatic schedule.
Instead of the policy with the automatic schedule, configure the backup script to provide the name of this policy with each user-directed backup request:
ALLOCATE CHANNEL…PARMS=’ENV=(NB_ORA_POLICY=<second_policy_name>)’;
or
SEND ‘NB_ORA_POLICY=<second_policy_name>’;
The NetBackup master server configuration must allow the physical host names access to the backup images that are stored under the failover vipnames as follows:
cd /usr/openv/netbackup/db/altnames
echo “failover_vipname” >> hostname1
echo “hostname1” >> hostname1
echo “vipname1” >> hostname1
echo “hostname2” >> hostname1
echo “vipname2” >> hostname1
cp hostname1 hostname2
If the client hosts use REQUIRED_INTERFACE or another means to force NetBackup to use the IP addresses associated with the vipnames for the outbound user-directed backup requests, then also allow the vipnames to access all of the backup images.
cd /usr/openv/netbackup/db/altnames
cp hostname1 vipname1
cp hostname1 vipname2
Option A: The NetBackup scheduler starts three automatic jobs, and each runs the backup script (two of them on the same host). The two executions of the backup script that receive the vipnames exit immediately with status 0 to avoid a redundant backup and any retries. The third execution of the backup script that receives the failover_vipname, starts RMAN. RMAN then sends the data for backup by using the appropriate client name for the instance-host. NetBackup stores the backup images under the initiating policy by using both client names.
Option B: The first policy runs the backup script by using the failover vipname . RMAN sends the name of the second policy and the configured client names for each channel with the user-directed request from each host. The second policy stores the backup images by using both client names.
Either client can initiate a restore. RMAN must be configured with ‘SET AUTOLOCATE ON;’ to request the backup set pieces from the appropriate instance-host that performed the backup. Alternatively, you can restore from either host-instance if you configure each restore request to include the correct client name used at the time the backup set piece was transferred to storage.
SEND ‘NB_ORA_CLIENT=client_name_used_by_backup’
$$$$$$$$$$$$$$$$$$$$$$$$$$$$$$$$$
OS Configurations recommended for NetBackup 7.6
Running preinstall checker…
ok nbdb_maintenance_space: no NBDB maintenance required on new install: skipping
ok nbdb_ntfs_dir_symlink: inapplicable on linux: skipping
ok nb_7601_hotfix_auditor: No potential for regression of hotfixes or EEBs was detected.
not ok ulimit_nofiles: nofiles ulimit 1024 is too low.
NetBackup Master and Media Server processes may run slower if they are
limited to fewer than 8000 open file descriptors. This test runs
‘ulimit -n’ and checks that the result is at least 8000 on NetBackup
servers. See
https://www.symantec.com/docs/TECH75332
for more information.
not ok semaphore_limits: too low:
Performance of NetBackup Master and Media Servers can be affected
adversely if the system is configured with low semaphore limits. This
test checks whether the current semaphore limits are high enough. See
https://www.symantec.com/docs/TECH203066 for details.
The current SEMMNI setting is 128; at least 1024 is recommended.
The current SEMMSL setting is 250; at least 300 is recommended.
The current SEMMNS setting is 32000; at least 307200 is recommended.
not ok ulimit_nofiles: nofiles ulimit 1024 is too low.
NetBackup Master and Media Server processes may run slower if they are
limited to fewer than 8000 open file descriptors. This test runs
‘ulimit -n’ and checks that the result is at least 8000 on NetBackup
servers. See
https://www.symantec.com/docs/TECH75332
for more information.
not ok semaphore_limits: too low:
Performance of NetBackup Master and Media Servers can be affected
adversely if the system is configured with low cphore limits. This
test checks whether the current semaphore limits are set as
recommended. See https://www.symantec.com/docs/TECH203066 for
details.
The current SEMMNI setting is 128; at least 1024 is recommended.
The current SEMMSL setting is 250; at least 300 is recommended.
The current SEMMNS setting is 32000; at least 307200 is recommended.
ok nb_7603_hotfix_auditor: No potential for regression of hotfixes or EEBs was detected.
“ulimit_nofiles” value has to be changed from 1024 to 10000
Reference: https://www.symantec.com/docs/TECH75332
“semaphore_limits” value has to be changed as below
The current SEMMNI setting is 128; at least 1024 is recommended.
The current SEMMSL setting is 250; at least 300 is recommended.
The current SEMMNS setting is 32000; at least 307200 is recommended.
Reference: https://www.symantec.com/docs/TECH203066
$$$$$$$$$$$$$$$$$$$$$$$$$$$$$$$$$$$
Creating Windows event entries for Backup Success or failures
@setlocal ENABLEEXTENSIONS
@set LISTPATHS=”%~dp0\goodies\listpaths”
@for /F “delims=|” %%p in (‘%LISTPATHS% /s NB_MAIL_SCRIPT’) do @set NB_MAIL_SCRIPT=”%%p”
@set OUTF=”F:\Veritas\NetBackup\bin\BACKUP_EXIT_CALLED”
@REM —————————————————————————
@REM – Get date and time.
@REM —————————————————————————
@for /F “tokens=1*” %%p in (‘date /T’) do @set DATE=%%p %%q
@for /F %%p in (‘time /T’) do @set DATE=%DATE% %%p
@REM —————————————————————————
@REM – Check for proper parameter use.
@REM —————————————————————————
@if “%7” == “” goto BadParams
@if “%8” == “” goto GoodParams
:BadParams
@echo %DATE% backup_exit_notify expects 7 parameters: %* >> %OUTF%
@goto EndMain
:GoodParams
@if exist %OUTF% del %OUTF%
@REM —————————————————————————
@echo DATE: %DATE% >> %OUTF%
@echo CLIENT: %1 >> %OUTF%
@echo POLICY: %2 >> %OUTF%
@echo SCHEDULE: %3 >> %OUTF%
@echo STATUS: %5 >> %OUTF%
@echo RETRY JOB: %7 >> %OUTF%
@echo *** If status is greater than 1, the backup should be investigated. >> %OUTF%
@echo *** RETRY JOB: 0 = not complete and will retry, 1 = complete and will not retry. >> %OUTF%
@REM ##################################################################################
@REM ######## custom addition to email people when NB jobs complete. #############
@REM if “%2” EQU “{Policy Name}” goto EMAIL_EMAIL_SOMEONE
@REM goto STATUSCHECK
@REM :EMAIL_EMAIL_SOMEONE
@REM call %NB_MAIL_SCRIPT% person@company.com “NetBackup of blah completed.” %OUTF%
@REM goto STATUSCHECK
@REM ######## END custom addition to email people when NB jobs complete. #########
@REM ##################################################################################
@REM ##################################################################################
@REM ######## Custom – Check status of exit and log to eventlog appropriatley ####
:STATUSCHECK
set varEVT=%5
set /A EVT=%varEVT%+100
if “%5” EQU “150” goto EndMain
if “%5” EQU “288” goto EndMain
if “%5” EQU “26” goto EndMain
if “%5” EQU “0” goto INFORMATION
if “%5” EQU “1” goto WARNING
goto ERROR
:INFORMATION
@c:\windows\system32\eventcreate.exe /L Application /T INFORMATION /SO Netbackup_Job_Monitor /ID %EVT% /D “Backup completed for server: %1. The backup policy was %2 and the backup status was %5”
@goto SendMail
:WARNING
@c:\windows\system32\eventcreate.exe /L Application /T WARNING /SO Netbackup_Job_Monitor /ID %EVT% /D “Backup completed for server: %1. The backup policy was %2 and the backup status was %5”
@goto SendMail
:ERROR
@c:\windows\system32\eventcreate.exe /L Application /T ERROR /SO Netbackup_Job_Monitor /ID %EVT% /D “Backup completed for server: %1. The backup policy was %2 and the backup status was %5”
@goto SendMail
@REM ######## END LLC custom #########################################################
@REM ##################################################################################
:SendMail
REM call %NB_MAIL_SCRIPT% person@company.com “NetBackup backup exit” %OUTF%
goto EndMain
:EndMain
@endlocal
@REM – End of Main Program —————————————————–
$$$$$$$$$$$$$$$$
Managing settings using the NetBackup Appliance Shell Menu
The NetBackup Appliance Shell Menu enables you to manage IPMI settings using the following commands in the Support menu:
Table: IPMI commands
Command Description Options and description Example
IPMI Network Configure<IPAddress><Netmask><GatewayIPAddress> You can use this command to change IPMI configuration. • <IPAddress> – Specify the updated IP address of the remote management port.
• <Netmask> – Specify the updated Subnet mask.
• <GatewayIPAddress>- Specify the updated gateway IP address. IPMI Network Configure 192.168.0.15 255.255.255.0 255.255.255.4
IPMI Network Show You can use this command to view the remote management port information. None Support> IPMI Network Show IP Address Source : STATIC IP Address : 10.182.8.70 Subnet Mask : 255.255.240.0 Gateway IP Address : 10.182.1.1
IPMI Reset You can use this command to reset the IPMI. The IPMI must be reset only if the IPMI interface hangs or stops responding. The IPMI reset operation involves restarting the IPMI. None Support> IPMI Reset
IPMI User Add<USER_NAME> You can use this command to add new users for accessing the remote management port. <USER_NAME> – Specify the name of the user to be added. IPMI User Add New User
IPMI User Delete <USER_NAME> You can use this command to delete existing users who no longer use the remote management port. <USER_NAME> – Specify the name of the user to be deleted. IPMI User Delete Old User
IPMI User List You can use this command to list the users that have access to the remote management port. None Support> IPMI User List User name: abc User privilege: ADMIN User name : root User privilege: ADMIN
Note: For more information on the IPMI commands refer to the Symantec NetBackup Appliance Command Reference Guide.
$$$$$$$$$$$$$$$$$$$
How DD Boost works:
The OST plugin first sends a request to the Data Domain appliance to check the hash of the data packet. If the DD has already seen it, the full data packet is discarded and the block’s expiration is updated on the Data Domain. This is where Boost comes in handy. BUT, when the Data Domain does NOT find a duplicate block already stored, the media server must then send the second packet with all of the data. So, twice the number of data packets if your data does not dedupe well, which leads to poor performance and high CPU utilization all around.
$$$$$$$$$$$$$$$$$$$
How to un-install a NetBackup package in Linux
[root@urlxbkasnp01 control]# rpm -qa | grep -i sym
SYMCnbjre-7.1.0.0-0.x86_64
SYMCnbjava-7.1.0.0-0.x86_64
SYMCpddea-6.0600.0011.0117-0117.x86_64
SYMCnbclt-7.1.0.0-0.x86_64
[root@urlxbkasnp01 control]# rpm -e SYMCnbjava-7.1.0.0-0.x86_64
[root@urlxbkasnp01 control]# rpm -qa | grep -i sym
SYMCnbjre-7.1.0.0-0.x86_64
SYMCpddea-6.0600.0011.0117-0117.x86_64
SYMCnbclt-7.1.0.0-0.x86_64
[root@urlxbkasnp01 control]# rpm -e SYMCnbjre-7.1.0.0-0.x86_64
[root@urlxbkasnp01 control]# rpm -qa | grep -i sym
SYMCpddea-6.0600.0011.0117-0117.x86_64
SYMCnbclt-7.1.0.0-0.x86_64
[root@urlxbkasnp01 control]# rpm -e SYMCpddea-6.0600.0011.0117-0117.x86_64
[root@urlxbkasnp01 control]# rpm -e SYMCnbclt-7.1.0.0-0.x86_64
[root@urlxbkasnp01 control]# rpm -qa | grep -i sym
[root@urlxbkasnp01 control]# rpm -qa | grep -i nb
samba-winbind-clients-3.5.10-125.el6.x86_64
samba-winbind-clients-3.5.10-125.el6.i686
[root@urlxbkasnp01 control]#
$$$$$$$$$$$$$$$$
KMS Configuration
nbuuser@nalxbkasnp10:~> nbkms -createemptydb
Enter the Host Master Key (HMK) passphrase (or hit ENTER to use a randomly
generated HMK). The passphrase will not be displayed on the screen.
Enter passphrase :
Re-enter passphrase :
An ID will be associated with the Host Master Key (HMK) just created. The ID
will assist you in determining the HMK associated with any key store.
Enter HMK ID : hostmasterkey
Enter the Key Protection Key (KPK) passphrase (or hit ENTER to use a randomly
generated KPK). The passphrase will not be displayed on the screen.
Enter passphrase :
Re-enter passphrase :
An ID will be associated with the Key Protection Key (KPK) just created. The
ID will assist you in determining the KPK associated with any key store.
Enter KPK ID : keyprotectionkey
Operation successfully completed
nbuuser@nalxbkasnp10:~> netbackup start
NetBackup Authentication daemon started.
NetBackup network daemon started.
NetBackup client daemon started.
NetBackup SAN Client Fibre Transport daemon started.
NetBackup Discovery Framework started.
NetBackup Authorization daemon started.
NetBackup Event Manager started.
NetBackup Audit Manager started.
NetBackup Deduplication Manager started.
NetBackup Deduplication Engine started.
NetBackup Deduplication Multi-Threaded Agent started.
NetBackup Enterprise Media Manager started.
NetBackup Resource Broker started.
Rebuilding device nodes.
Media Manager daemons started.
NetBackup request daemon started.
NetBackup compatibility daemon started.
NetBackup Job Manager started.
NetBackup Policy Execution Manager started.
NetBackup Storage Lifecycle Manager started.
NetBackup Remote Monitoring Management System started.
NetBackup Key Management daemon started.
NetBackup Service Layer started.
NetBackup Indexing Manager started.
NetBackup Agent Request Server started.
NetBackup Bare Metal Restore daemon started.
NetBackup Web Management Console started.
NetBackup Vault daemon started.
NetBackup CloudStore Service Container started.
NetBackup Service Monitor started.
NetBackup Bare Metal Restore Boot Server daemon started.
nbuuser@nalxbkasnp10:~> ps -ef | grep kms
-bash: ps: command not found
nbuuser@nalxbkasnp10:~> nbkmsutil -createkg -kgname ENCR_ALT
New Key Group creation is successful
nbuuser@nalxbkasnp10:~> nbkmsutil -createkey -kgname ENCR_ALT -keyname altkey1 -activate -desc “Altisource First Key Created”
Enter a passphrase:
Re-enter the passphrase:
New Key creation is successful
nbuuser@nalxbkasnp10:~>
nbuuser@nalxbkasnp10:~> nbkmsutil -quiescedb
Key Store quiesce is successful
Outstanding Quiesce Calls: 1
nbuuser@nalxbkasnp10:~> nbkmsutil -unquiescedb
Key Store unquiesce is successful
Outstanding Quiesce Calls: 0
nbuuser@nalxbkasnp10:~> nbkmsutil -listkeys -kgname ENCR_ALT
Key Group Name : ENCR_ALT
Supported Cipher : AES_256
Number of Keys : 1
Has Active Key : Yes
Creation Time : Thu Sep 18 15:23:25 2014
Last Modification Time: Thu Sep 18 15:23:25 2014
Description : –
Key Tag : e7349483898c9a02a9db08024e6f70e60990451ccd68dbad42841cefacb6ead9
Key Name : altkey1
Current State : ACTIVE
Creation Time : Thu Sep 18 15:25:27 2014
Last Modification Time: Thu Sep 18 15:25:27 2014
Description : Altisource First Key Created
Number of Keys: 1
nbuuser@nalxbkasnp10:~> clear
nbuuser@nalxbkasnp10:~> exit
logout
maintenance-!> cd /usr/openv/kms
maintenance-!> ls -ltr *
ls: cannot open directory key: Permission denied
ls: cannot open directory db: Permission denied
maintenance-!> elevate
nalxbkasnp10:/usr/openv/kms # ls -ltr
total 8
drwx—— 2 root root 4096 Sep 18 15:25 key
drwx—— 2 root root 4096 Sep 18 15:25 db
nalxbkasnp10:/usr/openv/kms # ls -ltr *
key:
total 8
-rw——- 1 root root 137 Sep 18 15:25 KMS_KPKF.dat
-rw——- 1 root root 89 Sep 18 15:25 KMS_HMKF.dat
db:
total 4
-rw——- 1 root root 728 Sep 18 15:25 KMS_DATA.dat
[m [1m [31mnalxbkasnp10:/usr/openv/kms # tar -cvf /var/tmp/kms.tar
./
./db/
./db/KMS_DATA.dat
./key/
./key/KMS_HMKF.dat
./key/KMS_KPKF.dat
nalxbkasnp10:/usr/openv/kms # ls -ltr /var/tmp/kms.tar
-rw——- 1 root root 10240 Sep 18 15:31 /var/tmp/kms.tar
nalxbkasnp10:/usr/openv/kms # scp /var/tmp/kms.tar nbuuser@dalxbkasnp10 /home/nbusers
Warning: Permanently added ‘dalxbkasnp10,172.26.129.48’ (RSA) to the list of known hosts.
Password:
kms.tar 0% 0 0.0KB/s –:– ETA kms.tar 100% 10KB 10.0KB/s 00:00
nalxbkasnp10:/usr/openv/kms #
$$$$$$$$$$$$$$$
KMS Keys and Key Group deletion commands
[root@orlsxbk01]$nbkmsutil -modifykey -keyname ocnkey1 -kgname ENCR_ASPS -state inactive
Key details are updated successfully
[root@orlsxbk01]$nbkmsutil -modifykey -keyname ocnkey1 -kgname ENCR_ASPS -state deprecated
Key details are updated successfully
[root@orlsxbk01]$
[root@orlsxbk01]$nbkmsutil -modifykey -keyname ocnkey1 -kgname ENCR_ASPS -state terminated
Key details are updated successfully
[root@orlsxbk01]$
[root@orlsxbk01]$nbkmsutil -deletekey -keyname ocnkey1 -kgname ENCR_ASPS
Key deletion is successful
[root@orlsxbk01]$
[root@orlsxbk01]$nbkmsutil -deletekg -kgname ENCR_ASPS
Key Group deletion is successful
[root@orlsxbk01]$
$$$$$$$$$$$$$$$$$$$$$$$$$$$$$$$$$$$$$$$$$$$$$$$
To get Job Details
$$$$$$$$$$$$$$$$$$$$$$$$$$$$$$$$$$$$$$$$$$$$$$$
nolxbkocnp10:/usr/openv/netbackup/logs/user_ops/admin/logs # bperror -U -all -jobid 1167815 -d 05/01/2015 -e 06/22/2015 | grep _
ORLSZBK02_1430717402 (restore), copy 1, fragment 3, from
id ORLSZBK02_1430717402, copy 1, fragment 3, 10486774
ORLSZBK02_1430717402 (restore), copy 1, fragment 4, from
id ORLSZBK02_1430717402, copy 1, fragment 4, 37749760
ORLSZBK02_1430717402 (restore), copy 1, fragment 5, from
id ORLSZBK02_1430717402, copy 1, fragment 5, 31458304
ORLSZBK02_1430717402 (restore), copy 1, fragment 6, from
id ORLSZBK02_1430717402, copy 1, fragment 6, 4718592
nolxbkocnp10:/usr/openv/netbackup/logs/user_ops/admin/logs # bpimagelist -backupid ORLSZBK02_1430717402 -L | grep Backup
Backup ID: ORLSZBK02_1430717402
Backup Time: Mon May 4 01:30:02 2015 (1430717402)
Previous Backup Files File Name: (none specified)
Parent Backup Image File Name: (none specified)
Backup Status: 0
Backup Copy: Standard (0)
nolxbkocnp10:/usr/openv/netbackup/logs/user_ops/admin/logs #
$$$$$$$$$$$$$$$$$$$$$$$$$$
Making restore job to read from alternative copy without making that copy primary
Create the file ALT_RESTORE_COPY_NUMBER in the NetBackup root directory (/usr/openv/netbackup or <install path>\netbackup) containing the copy number to be used for restores – this value is than applied to all restores for all clients until the file is removed.
$$$$$$$$$$$$$$$$$
Steps involved in recovering the data on an alternative master server without import – NetBackup 7.5 and above:
1. Export the images in the old master server
Master 1:
[root@orlsxbk01]$ cat_export -client WPK3ECOCMP02 -staging -source_master orlsxbk01 -replace_destination
cat_export succeeded with images exported = 93 and images skipped = 0
[root@orlsxbk01]$cp -R /opt/openv/netbackup/db.export/images/WPK3ECOCMP02 /tmp/WPK3ECOCMP02
[root@orlsxbk01]$chmod 777 /tmp/WPK3ECOCMP02
[root@orlsxbk01]$
2. Import the images in the new master server
Master 2:
dolxbkocnp10:/usr/openv/netbackup # cp -R /inst/patch/incoming/WPK3ECOCMP02 /usr/openv/netbackup/db.export/images/WPK3ECOCMP02
dolxbkocnp10:/usr/openv/netbackup/db.export/images/WPK3ECOCMP02/1355000000 # cat_import -client WPK3ECOCMP02
[000:00:00] Initiating import for client: WPK3ECOCMP02
[000:00:01] Finished importing images for client: WPK3ECOCMP02 with 93 imported, 0 skipped, 0 corrupt.
[000:00:01] Overall progress: 93 images imported, 0 skipped, 0 corrupt. Import rate = 93 images/sec
cat_import succeeded with images added = 93, images skipped = 0, images corrupt = 0
dolxbkocnp10:/usr/openv/netbackup/db.export/images/WPK3ECOCMP02/1355000000 #
3. Open the BAR and check out the images
Reference:
http://www.symantec.com/connect/forums/catimport-requirement
https://support.symantec.com/en_US/article.TECH28722.html
$$$$$$$$$$$$$$$$$$$$$$$$
Where to find MIB files for NetBackup OpsCenter
$$$$$$$$$$$$$$$$$$$$$$$$$$
Solution
MIB files can be found in the following locations on OpsCenter servers:
Windows path:
<install_path>\OpsCenter\server\config\snmp
UNIX path:
/opt/SYMCOpsCenterServer/config/snmp
$$$$$$$$$$$$$$